Cross-platform release builds with Github Actions
Scott
Using a Cloud CI/CD provider is a easy way to issue release builds of your UI on Windows, macOS and Linux.
Running a build for a particular target OS requires a host with the matching OS, i.e. macOS builds are performed on a machine running macOS (but different versions are fine). I normally develop and test user interfaces on my development machine running Linux, so my process follows:
- Run the build for Linux on my development machine.
- Reboot the development machine into Windows, clone the project repository, run the build.
- Dig out my laptop for macOS, clone the project repository, and then run the build.
- Grab all three release build archives, format release notes, and upload to a cloud storage service.
While this process isn't particularly hard, it takes about 20 minutes to run through the whole process.
This approach falls apart if the developer doesn't have immediate access to each OS, and relies on manual labour for an easily automatable task.
So lets use cloud hosted infrastructure for our builds!
Cloud CI Options
There's a lot of competition in the cloud CI/CD space. Historically, many providers would offer Linux build machines with occasional inclusion of Windows or macOS, but the combination of all three wasn't as common or affordable as it is today.
Cost is a point worth consideration before committing to a specific CI vendor, as the effort to setup and maintain tooling isn't always trivial, and the value proposition will differ based on:
- Existing software development practices which already use CI/CD, or hosted source control services,
- if you already use paid GitHub or GitLab etc, their offerings are more attractive.
- If you already have access to macOS hardware,
- If dual-booting Windows and a Linux distro is practical,
- How often builds need to be created and published.
- How fast a given job needs to be completed.
Cloud providers use a concept of build minutes or tokens as an abstract unit for billing reasons. Operating systems like macOS and Windows are typically more expensive to run than Linux, while concurrency and differing hardware capabilities mean you can consume multiple minutes of compute per real-world elapsed minute.
Many paid plans base their billing system on concurrency - you can have unlimited time with a small instance, but can only execute jobs with one build runner.
I'll quickly summarise a subset of popular options, compare the value in their free/evaluation packages, and estimate the cost-per-build. We're only interested in CI, so this ignores unrelated bundled features.
| OS Support | Free plan | Paid Plan | Est Build cost | Self-hosted runners | |
|---|---|---|---|---|---|
| Circle CI | ✓* | 10k credits/mo | $15 + $15/25k credits | ✕ | |
| Travis CI | ✓ | 10k credits/mo | $70/mo per runner | ✕ | |
| GitLab | ? | 400 minutes/mo | $19/mo for 10k minutes | ✓ | |
| Github Actions | ✓ | 2k minutes/mo | $8/1k minutes thereafter | 56 minutes - or ~$0.50 | ✓ |
| Azure DevOps | ✓ | 1.8k minutes/mo | $40/mo per runner | ✓* |
For the rest of this post, I'll be demonstrating integration with GitHub Actions.

For individuals and smaller teams already using GitHub it represents compelling value:
- The free allocation of 2k minutes gives you ~35 builds for free ($0.50 each),
- Access to all the operating systems with the free tier,
- Generous concurrency limits allow builds to complete faster,
- Self-hosted runners aren't paywalled, a nice-to-have.
Setup with GitHub Actions
GitHub's documentation for Actions is generally well written, so we won't rehash the basics too much.
This demonstration workflow has two jobs, build and release.
- The
buildjob runs against a matrix of operating systems, the latest versions of Ubuntu, Windows and macOS for this example. releaseis a small job which runs on Linux after thebuildjob finishes successfully. It simply grabs the build artifacts from each OS and publishes a GitHub Release.
Pushing or creating a pull-request against the master branch will trigger the workflow. This allows developers to work and iterate on feature branches without excessively consuming build resources.
This is the skeleton of our .github/workflows/builds.yml workflow file:
name: Production Buildson: push: branches: [ master ] pull_request: branches: [ master ] workflow_dispatch:jobs: build: strategy: matrix: os: [ubuntu-latest, windows-latest, macos-latest] runs-on: ${{ matrix.os }} steps: # ... # ... release: name: "Prelease" needs: build runs-on: ubuntu-latest steps: # ... # ...I'll now describe the two jobs in a bit more detail.
build
As mentioned previously, this job runs against the matrix of target operating systems at the same time.
- Download and install dependencies
- Login to
arcwith Electric UI credentials - Run
arc build - Upload the build product to GitHub as an artifact.
This isn't particularly complicated, but there are a few small details to take note of.
-
When downloading and installing
arc, we can't use the same download command on Windows as it usespwshPowershell by default.-
To resolve this, there are two steps for the
arcdownload, conditional on the OS in use. -
For Linux-like shells, we download our setup script and execute it with bash:
- name: Install eUI on bashif: matrix.os != 'windows-latest'run: curl https://install.electricui.com | bash -
On Windows specifically, we download and unzip
arc.exe, then add it toPATHso it can be called in future steps.GITHUB_PATHis a nice environment helper which makes this a little easier:- name: Install eUI on pwshif: matrix.os == 'windows-latest'run: |Invoke-WebRequest -Uri "https://registry.eui.io/arc/latest/arc_latest_windows_amd64.zip" -OutFile "arc_latest_windows_amd64.zip"expand-archive -path 'arc_latest_windows_amd64.zip' -destinationpath 'electricui-arc'echo "electricui-arc" | Out-File -Append -FilePath $env:GITHUB_PATH -Encoding utf8 -
The logs show which install stage didn't run with the little greyed out tick

-
-
CI logins to
arcare made easier by setting environment variables for the account username and password.-
Provide credentials with the
ARC_EMAILandARC_PASSWORDfields through "Settings > Secrets > New repository secret"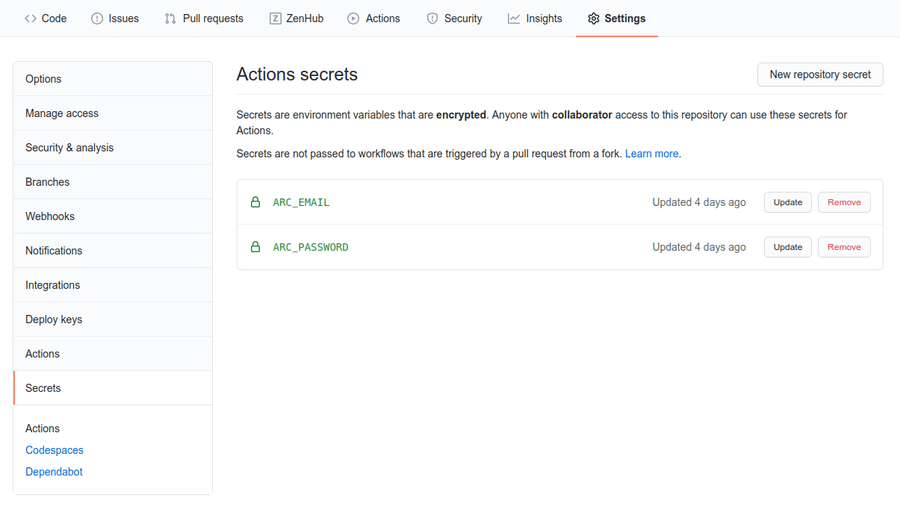
-
-
Because the zip outputs from the build stage are named
projectname-version.zip, remember to set a specific name for the artifact upload. Repeatedly uploading artifacts with the same name will overwrite previous artifacts. -
We manually set a retention duration on the artifacts, as GitHub charges for storage. When the
releasejob is run these artifacts are set free into GitHub Releases where they don't consume storage allocations.


Rolling the steps together gives us the complete setup and build job.
Because our user interface isn't in the root of the repository, you'll see pathing to a
hello-gh-actionsdirectory in the build and artifact stage which need to changed to suit your directory structure.
build: # Build on Linux, Windows and MacOS strategy: matrix: os: [ubuntu-latest, windows-latest, macos-latest] runs-on: ${{ matrix.os }} steps: # Checks-out your repository under $GITHUB_WORKSPACE - uses: actions/checkout@v3 - uses: actions/setup-node@v3 with: node-version: '18' # Download Electric UI's arc tool - name: Install eUI on bash if: matrix.os != 'windows-latest' run: curl https://install.electricui.com | bash - name: Install eUI on pwsh if: matrix.os == 'windows-latest' run: | Invoke-WebRequest -Uri "https://registry.eui.io/arc/latest/arc_latest_windows_amd64.zip" -OutFile "arc_latest_windows_amd64.zip" expand-archive -path 'arc_latest_windows_amd64.zip' -destinationpath 'electricui-arc' echo "electricui-arc" | Out-File -Append -FilePath $env:GITHUB_PATH -Encoding utf8 # Login to electricui - name: Setup eUI env: ARC_EMAIL: ${{ secrets.ARC_EMAIL }} ARC_PASSWORD: ${{ secrets.ARC_PASSWORD }} run: | arc login arc info # Build end-user application binaries - name: Build UI run: | cd hello-gh-actions arc build # Upload the end-user binary artifact - uses: actions/upload-artifact@v3 with: name: fancyui-${{ matrix.os }} path: hello-gh-actions/release/*.zip retention-days: 1Note: When setting up a build job like this for your project, I recommend reducing the build matrix down to just
ubuntu-latestto reduce the time spent waiting for test runs.
It's wise to download and check the build artifacts run on your machine before going too much further. If they don't - let us know and we'll help you get things running smoothly.

With successful artifact uploads from each OS to GitHub, it's time to automate releases as well.
release
This is a really simple pipeline - adding the binaries to a release requires an additional action. As each OS is run separately, they don't have the other build files to upload to the release, and making each OS manually edit a release draft isn't a practical solution.
This job depends on the build job completing successfully - hence the needs: build line.
We download the 3 artifacts from the build job, and then issue a draft release.
A tag is added to the triggering commit called latest. When issuing actual releases, this tag should correspond to the version number of the UI.
release: name: "Prelease" needs: build runs-on: ubuntu-latest steps: # We don't need the repo, grab all artifacts from the build stage # The plugin puts each artifact in a folder of `artifactname` - uses: actions/download-artifact@v3 - name: Display fetched artifacts run: ls -R - name: Emit a Github Release uses: "marvinpinto/action-automatic-releases@latest" with: repo_token: "${{ secrets.GITHUB_TOKEN }}" automatic_release_tag: "latest" prerelease: true title: "Development Build" files: | fancyui-windows-latest/*.zip fancyui-macos-latest/*.zip fancyui-ubuntu-latest/*.zipOnce this job is added to the workflow, it appears after the build matrix.

After a successful run of the pipeline, a release should be visible.

That's it, fully automated cross-platform builds of your user interface. Feel free to manually edit the release with additional notes etc.
If you have a website where you host your software, consider adding an additional job to upload the zips when you issue tagged releases.
Summary
Because the build stages occurs in parallel, the whole process completes in under 5 minutes of real-world time.
When looking at the job summary, the "Billable Time" is listed. The translation to cost is a little confusing as it represents the sum of real-world durations of the jobs.

From the docs, Windows minutes are charged at a double-time rate, and macOS is charged at a 10x multiple.
| OS | Minutes | Rate | Cost |
|---|---|---|---|
| Ubuntu | 3.5 | $0.008 | $0.028 |
| Windows | 4 | $0.016 | $0.064 |
| macOS | 4.5 | $0.080 | $0.360 |
This gives us a total cost of $0.452 for this run or ~56 minutes. With a non-paid GitHub account/org's 2000 included minutes, that's enough for daily builds.
If you work in a collaborative environment, or commit directly to master often we'd recommend tweaking the build triggers slightly.
Or consider making your own existing machines do the work with self-hosted runners!