A scenic route towards continuous integration
Scott
As with most projects, being able to trust your work, validate reliability, and visualise issues, makes the development process far less stressful while helping to reduce the occurrences of strange errors or regressions.
I believe that infrastructure investments into tooling, testing, benchmarks, and hardware-in-the-loop testing is absolutely invaluable. For Electric UI, we use a pretty wide range of tools including:
- Unity (through Ceedling) for C unit testing,
- afl-fuzz for occasional binary fuzz testing,
- JS/Typescript unit tests,
- Spectron for UI integration tests,
- storybook-screenshotter creates automated screenshots for documentation,
- Hardware in the loop tests against Electric UI's core,
- Automated changelogs and versioning info is produced for all tagged commits,
- Custom bash scripts to test that all Arduino examples compile for different targets,
- Builds of our public facing
arctooling, - Builds of our internal
silversmithtooling.
We have also designed our web infrastructure around CI/CD concepts, as well as validation of specific upstream packages and internal tooling. A focus on CI/CD includes stronger documentation and reduced bus factor.
While running these locally as part of the development process is fine, centralised CI services with reporting is better again, and I really wanted the ability to do full product integration tests to validate everything between the embedded library, hardware interaction, and a built UI running on each of our supported operating systems; Windows, macOS, and Linux (Ubuntu/Debian at a minimum).
How is this all going to work anyway?
Cloud CI?
Cloud CI/CD providers like Travis CI, Circle CI, and AppVeyor are all compelling options, allowing us to run our unit tests and build artefacts as part of our staging and release pipelines.
Between us, we've used Jenkins, TravisCI and CircleCI. Travis and Circle are both great.
There are some issues with that approach for our use case though,
- It gets pretty expensive when you need builds/tests on 3 distinct operating systems,
- Hardware testing isn't possible, as we don't have physical/persistent access,
- Performance benchmarking is pretty hard due to the shared and scaling nature of these services,
- We want the ability to test against 'real world' networking environments in the future,
For these reasons, along with a sense of curiosity, we decided to roll our own solution which would give us the ability to hang hardware out the back and perform network related tests as well.
Some months after starting this process, some commercial cloud CI providers have started offering local build workers which muddies the waters a little more.
Which CI/CD ecosystem to use?
There were a number of CI solutions investigated, our top requirements meant that it would be self-hosted, and support build agents on all of our target OS's.
We ended up picking GoCD, as it has distributed build agents based on Java, a reasonably good looking UI with good pipeline/staging support, and it seemed reasonably well documented.
Having personally used Jenkins in a previous job, I was keen to try something else.
What's it run on?
Self-hosted CI software means BYO hardware. While we could theoretically package a series of hardware boards into a rack and use a COLO solution, I decided we would start small.
To start with, I decided hardware suitable to run "3-4 VM's" would be enough to start, and then we could reassess once hardware requirements became more obvious later on. It also gave me the excuse to test out some new parts and ideas.
In practice, we ended up running a mix of 'fat' virtual machines, and docker containers, totalling around 8-10 instances in most cases (and we are OK performance wise right now, though its approaching marginal).
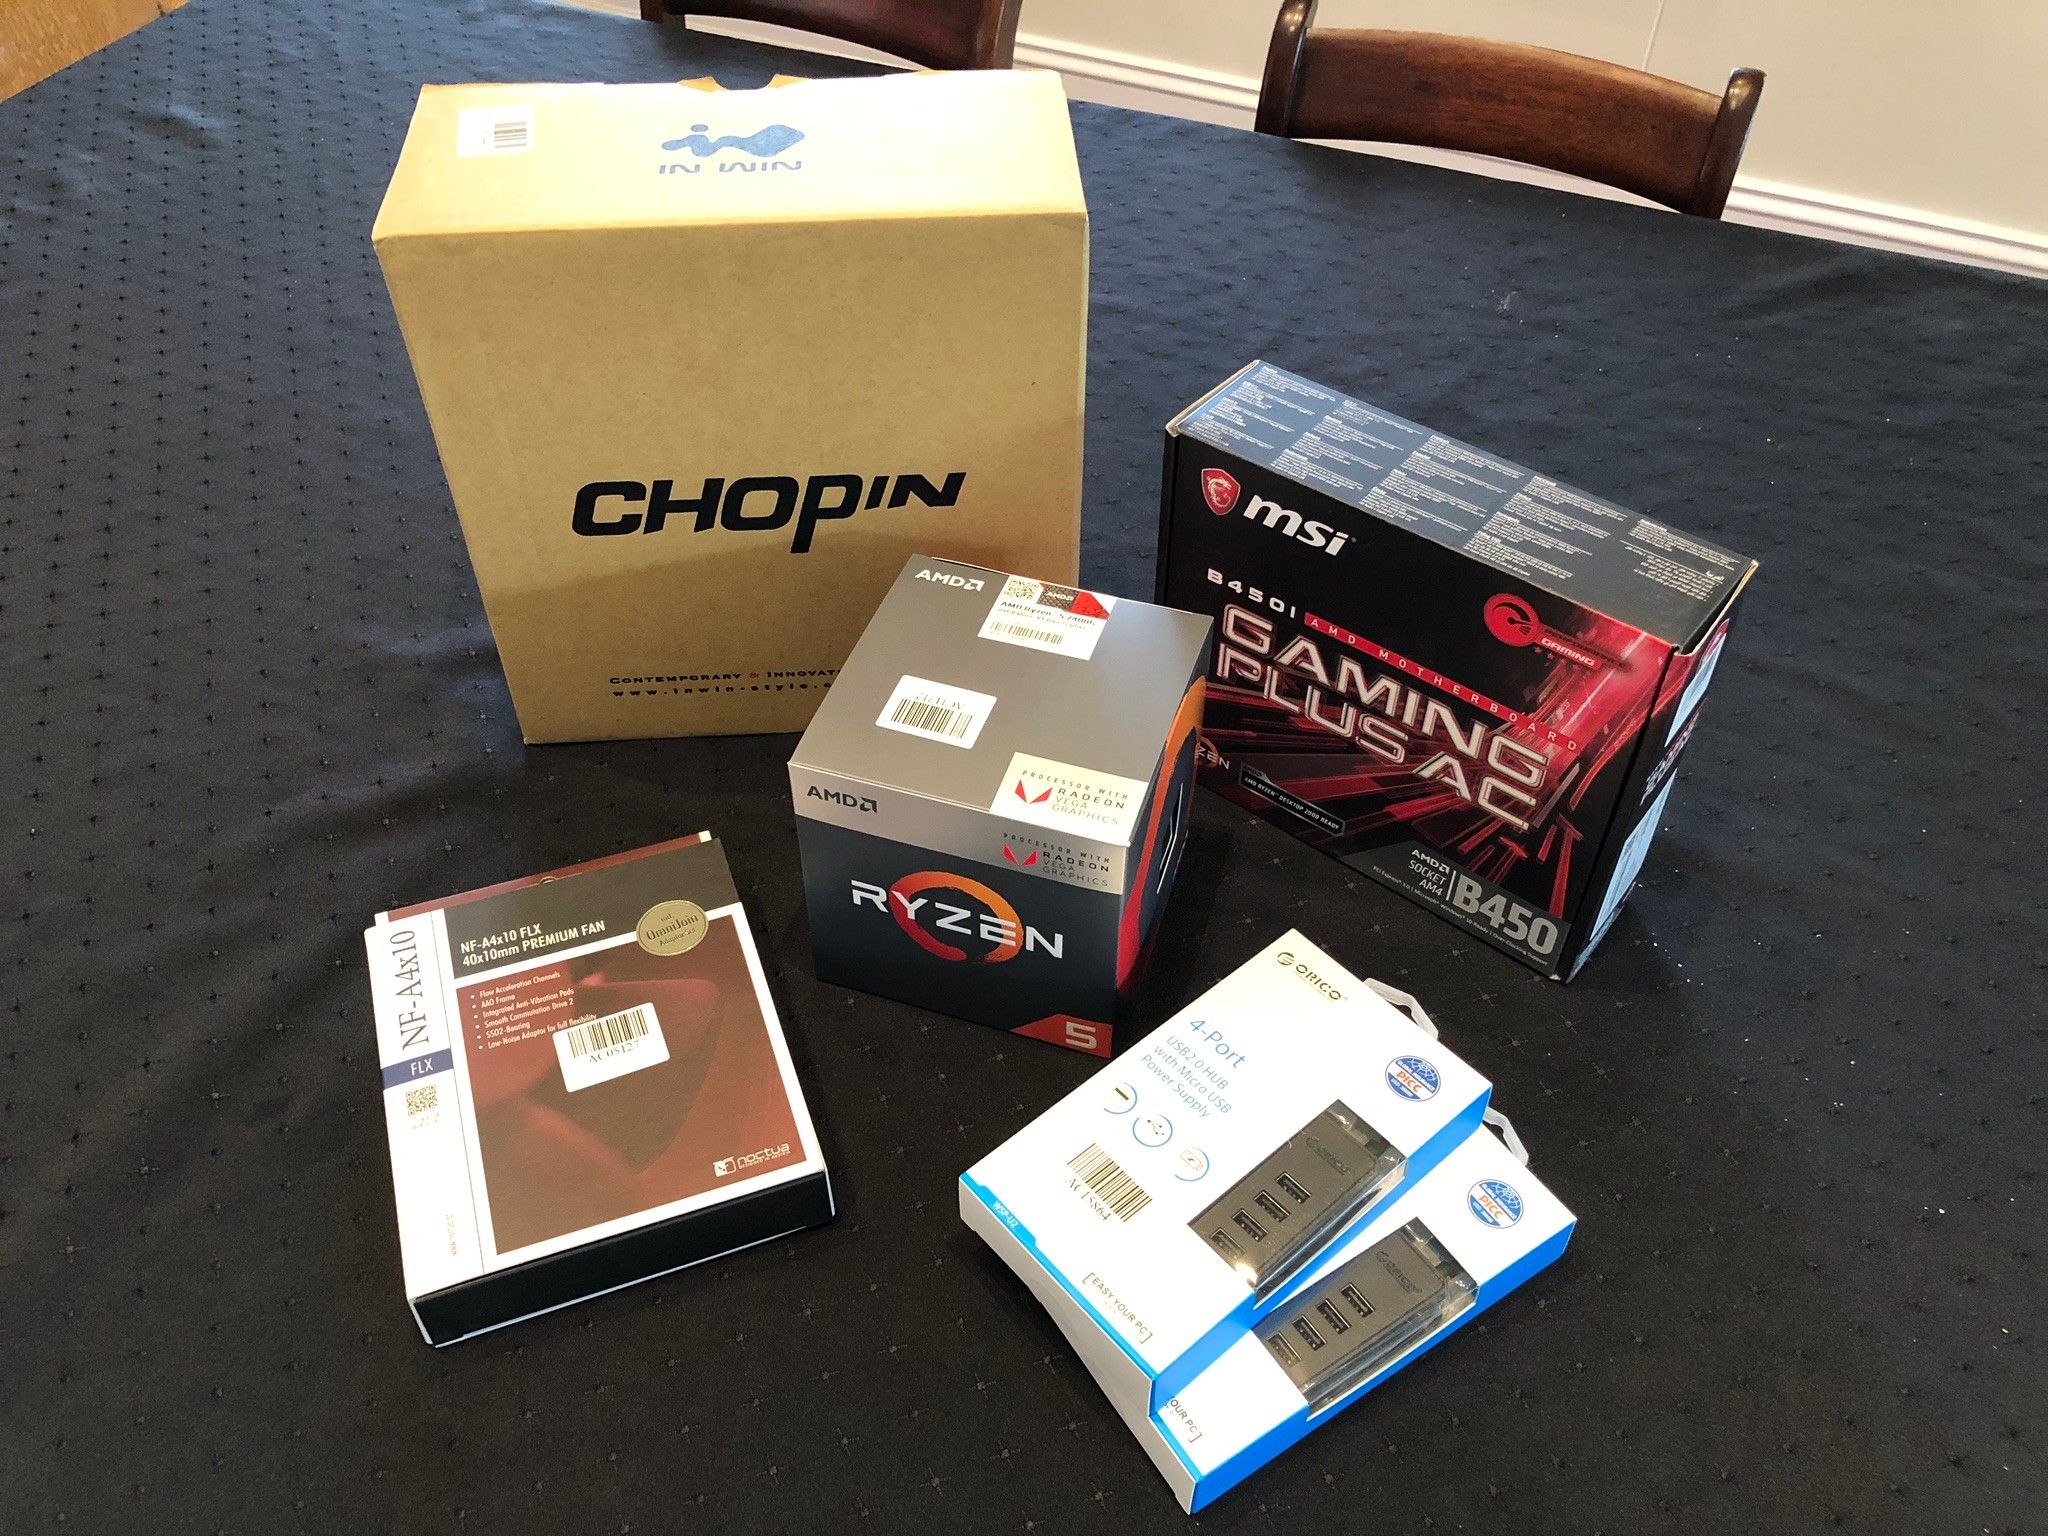
The parts for the build were picked up for a final cost just under $770 AUD, as I already had 16GB of DDR4 on hand.
| Part | Price (AUD) |
|---|---|
| Ryzen 5 2400G | $245 |
| MSI B450I GAMING PLUS AC AM4 Mini-ITX | $180 |
| 16GB 2666Mhz DDR4 (Kingston HyperX) | $170 |
| Samsung 970 EVO Plus 500GB NVMe SSD | $160 |
| In Win Chopin Mini-ITX Case (comes with a 150W integrated PSU) | $110 |
| Noctua 40mm NF-A4x10 FLX | $20 |
| Total ( +shipping ) | $885 + 45 |
I also grabbed a few USB hubs to run hardware test devices from.
Yak Shaving, for PC builds...
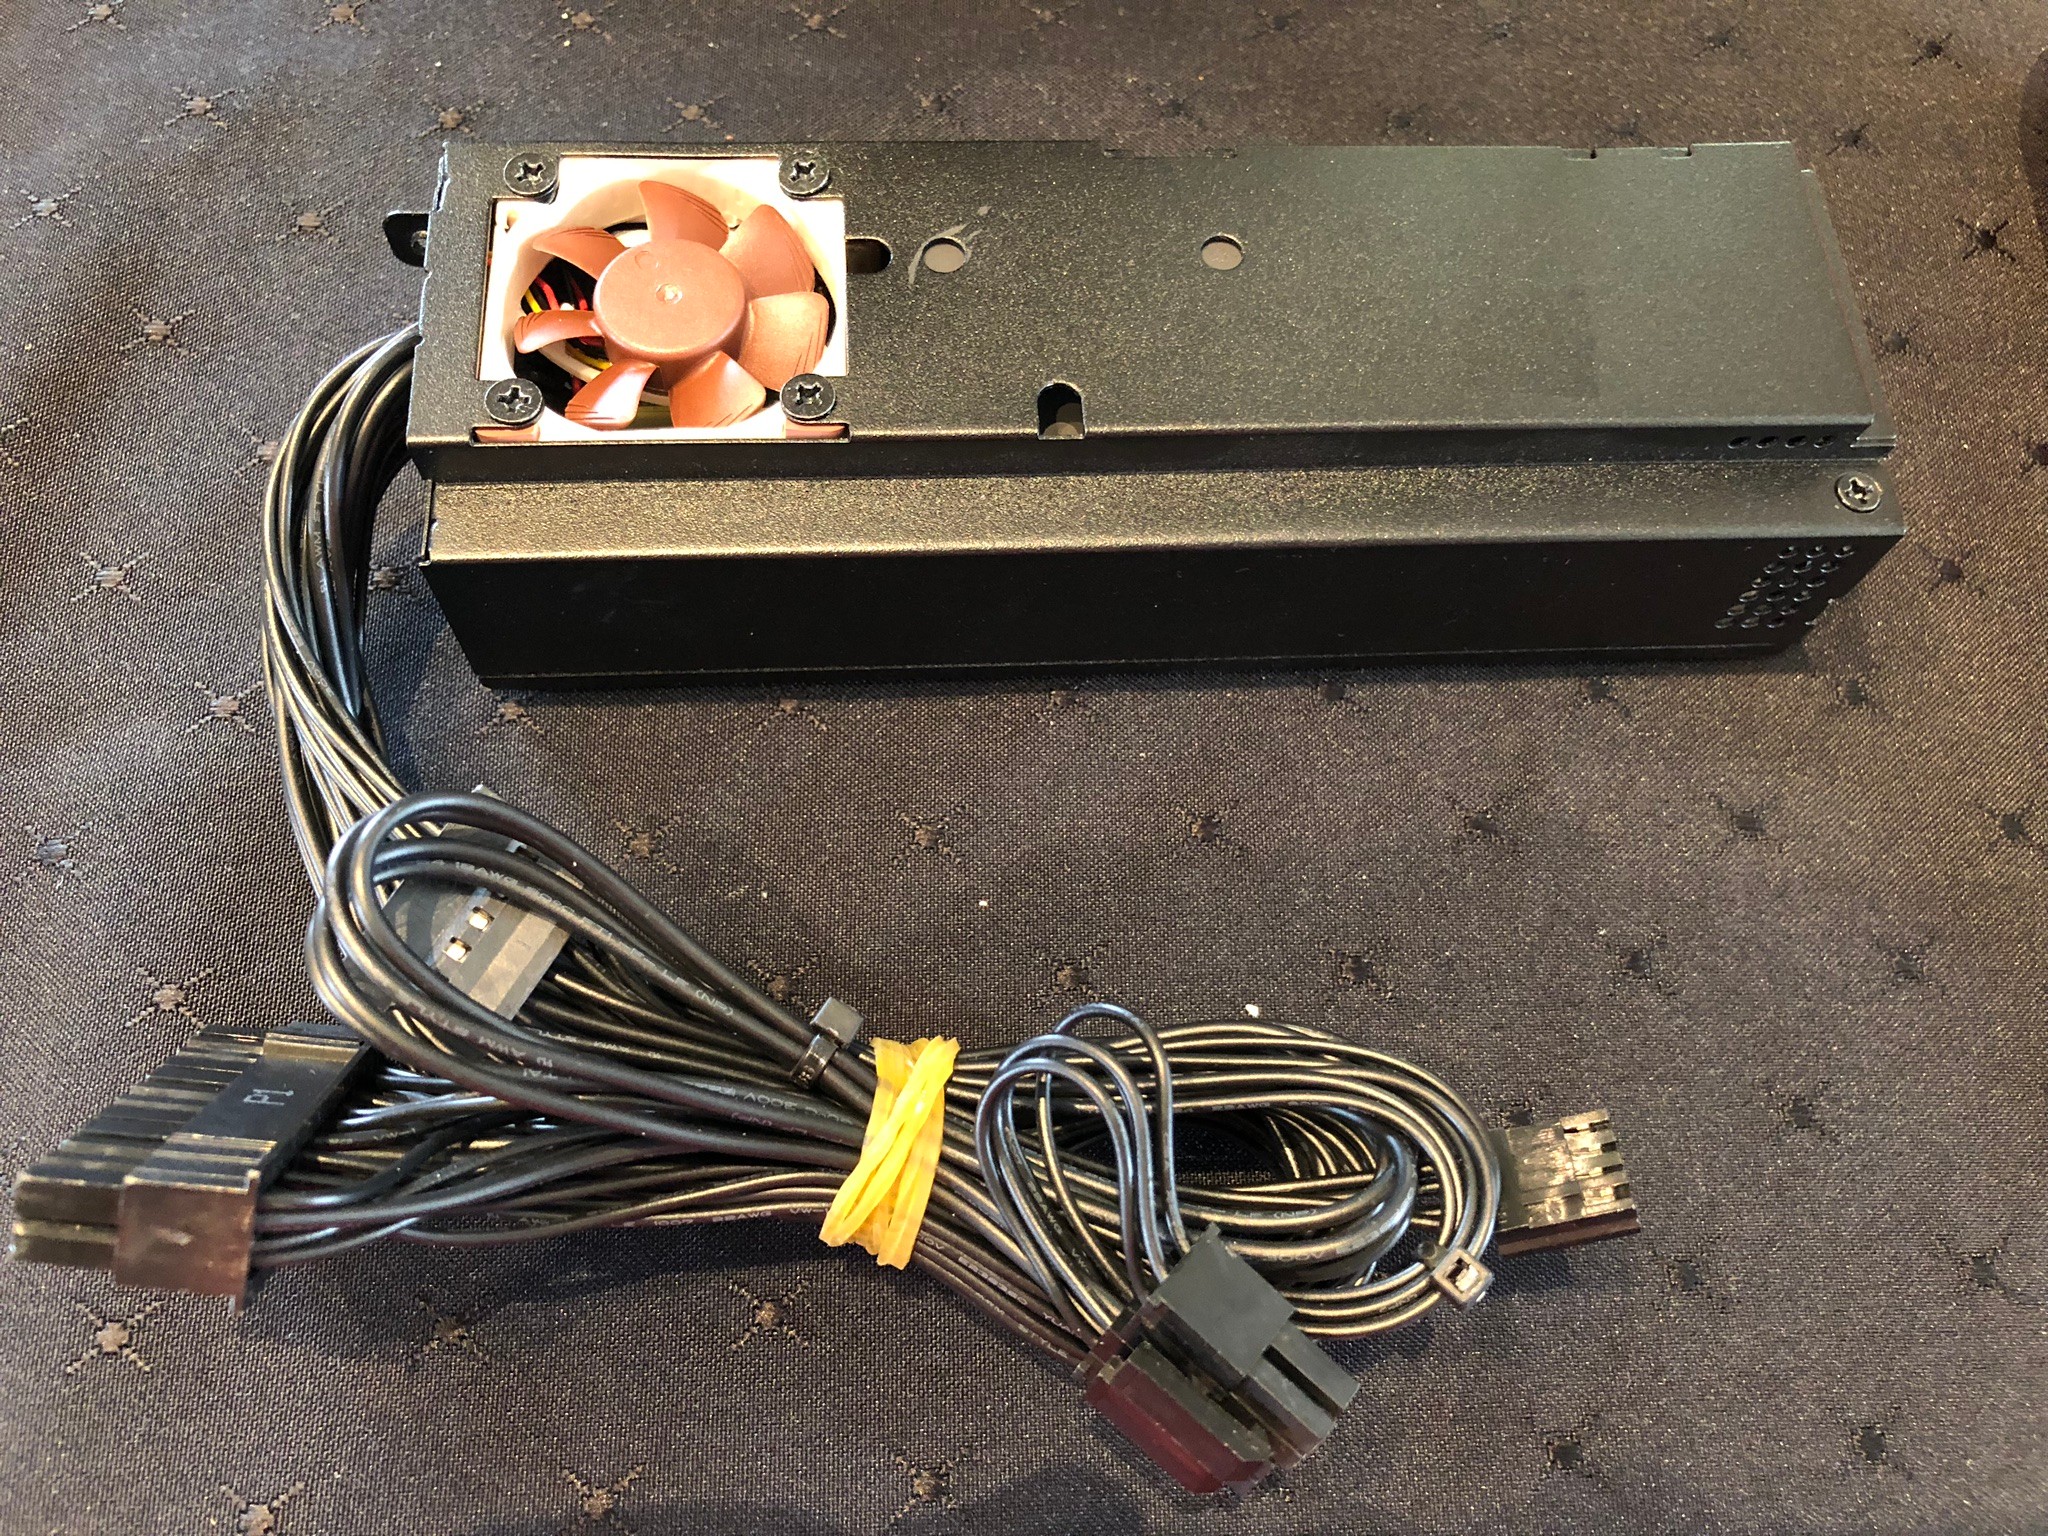
People online reported the fan in the Chopin's internal PSU being quite loud/annoying and lower quality than liked, so rather than build the system and then pull it apart later, I replaced the fan first.

While I had it in pieces, I decided to quickly compare the fan against the Noctua A4-10.
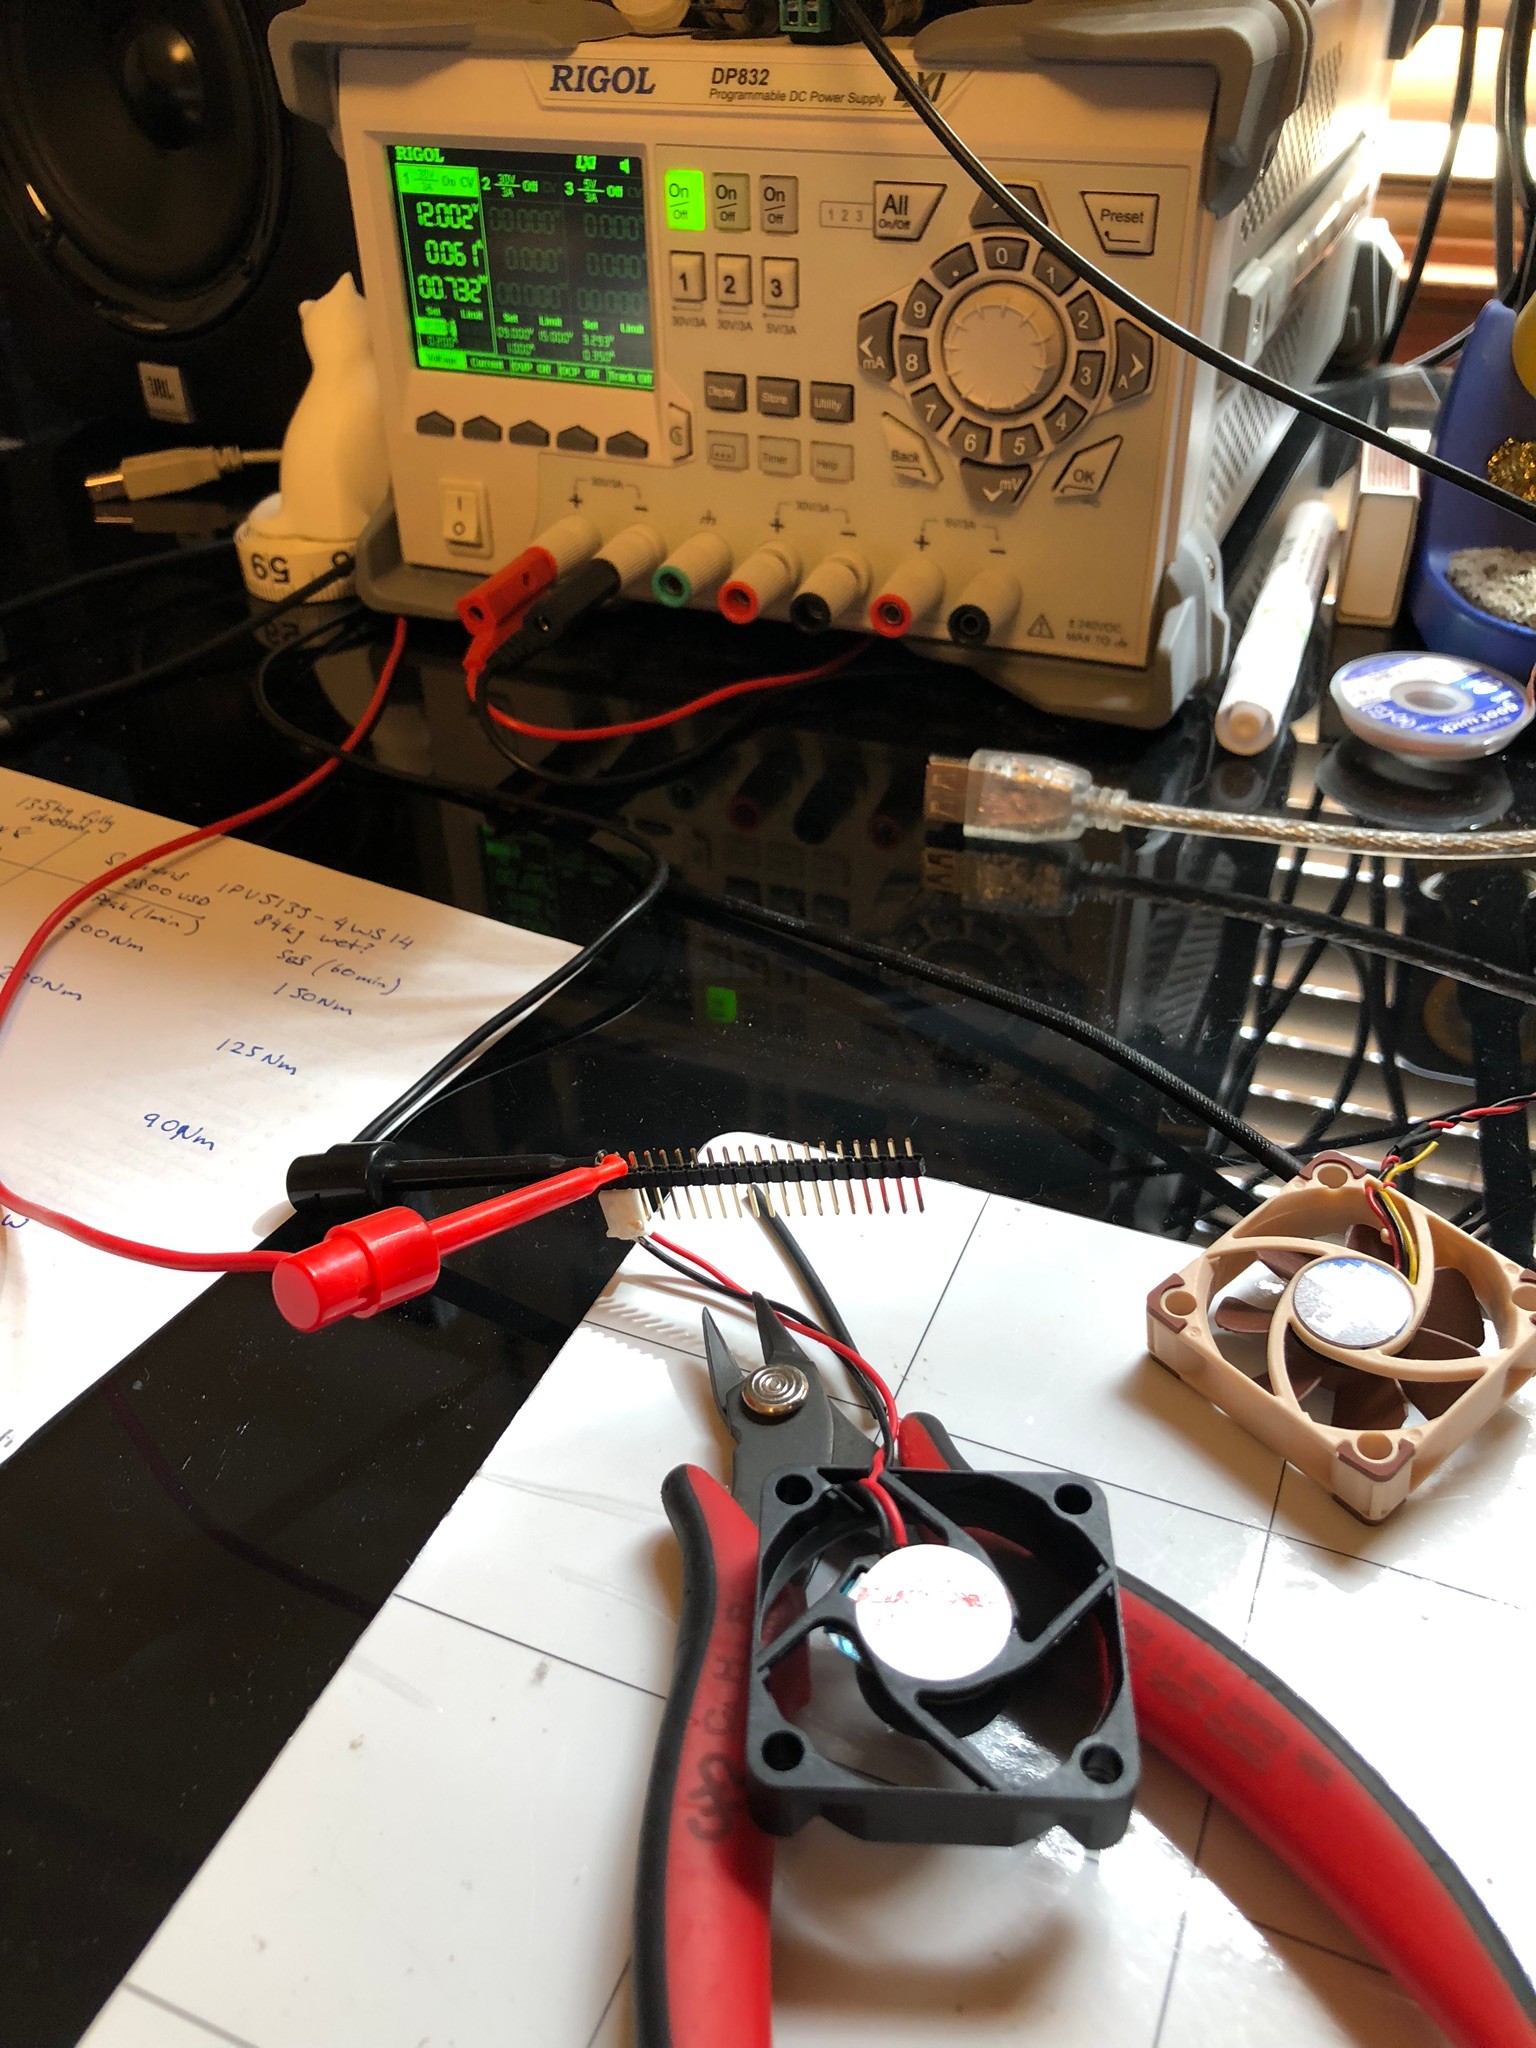
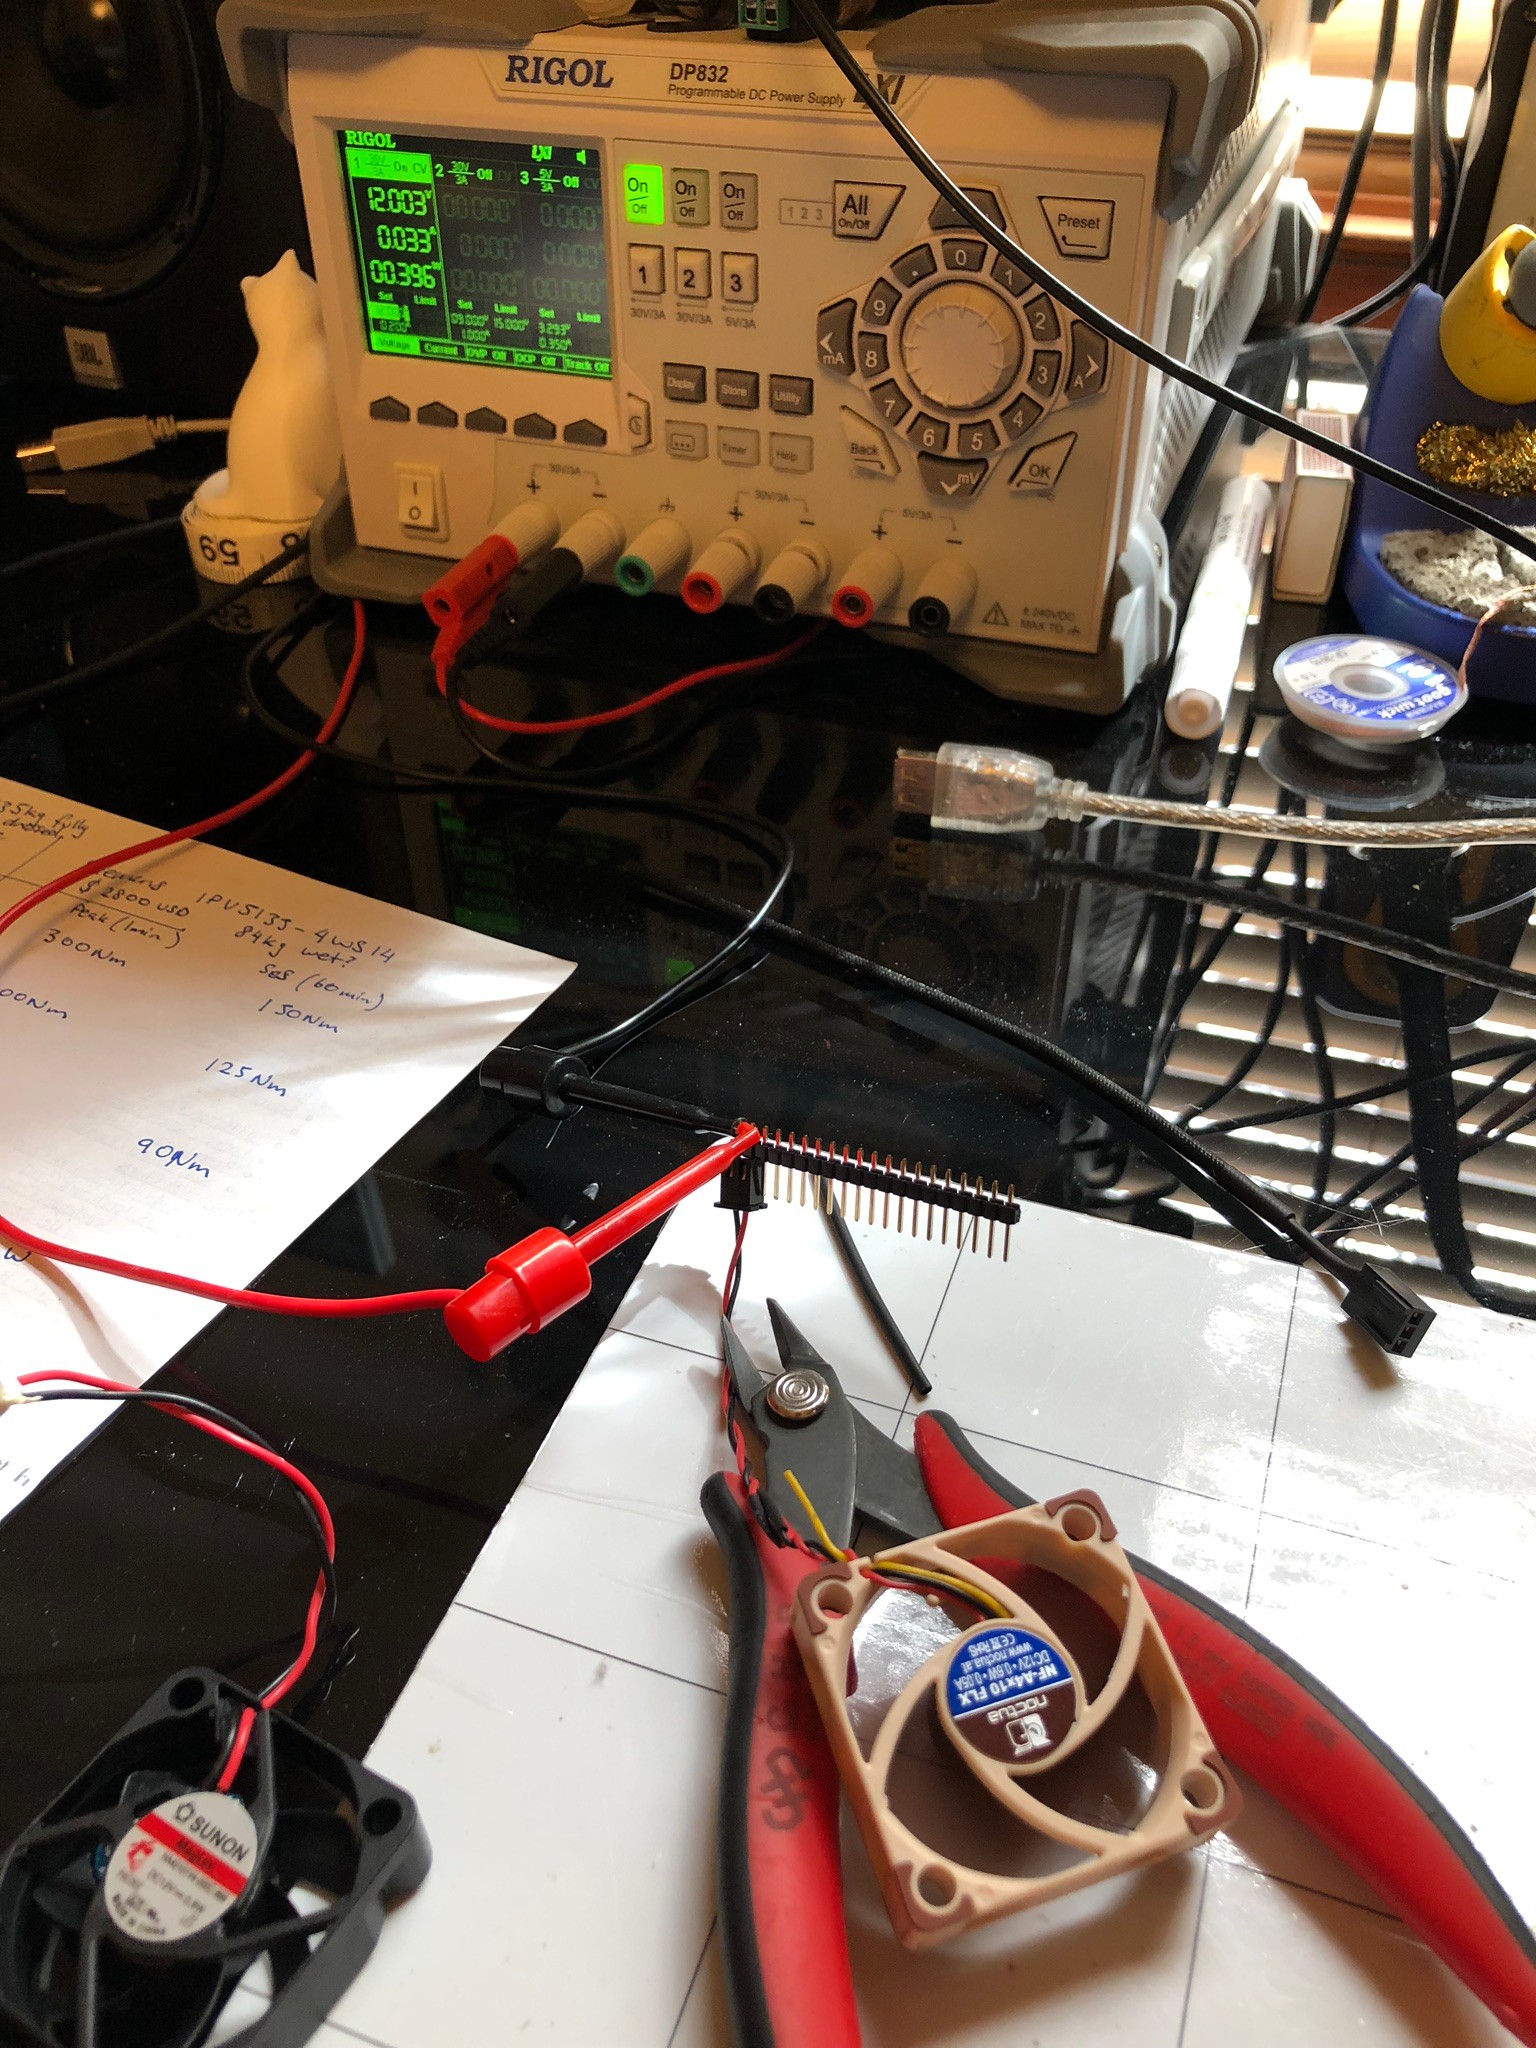
The Noctua fan was barely audible even with an earlobe being chewed by the fan, while the Sunon was audible at sitting distance (0.5m) with more noticeable rattle during spool up and down.
| Fan | Quoted Power | Power Consumption | Quoted RPM | Measured (unloaded) RPM | Quoted noise & CFM |
|---|---|---|---|---|---|
| Sunon 40mm | 1.08W | 0.73W | 7000 | 5690 | 32dBA, 8CFM |
| Noctua A4-10 FLX | 0.6W | 0.39W | 4500 | 4350 | 18dBA, 4.9CFM |
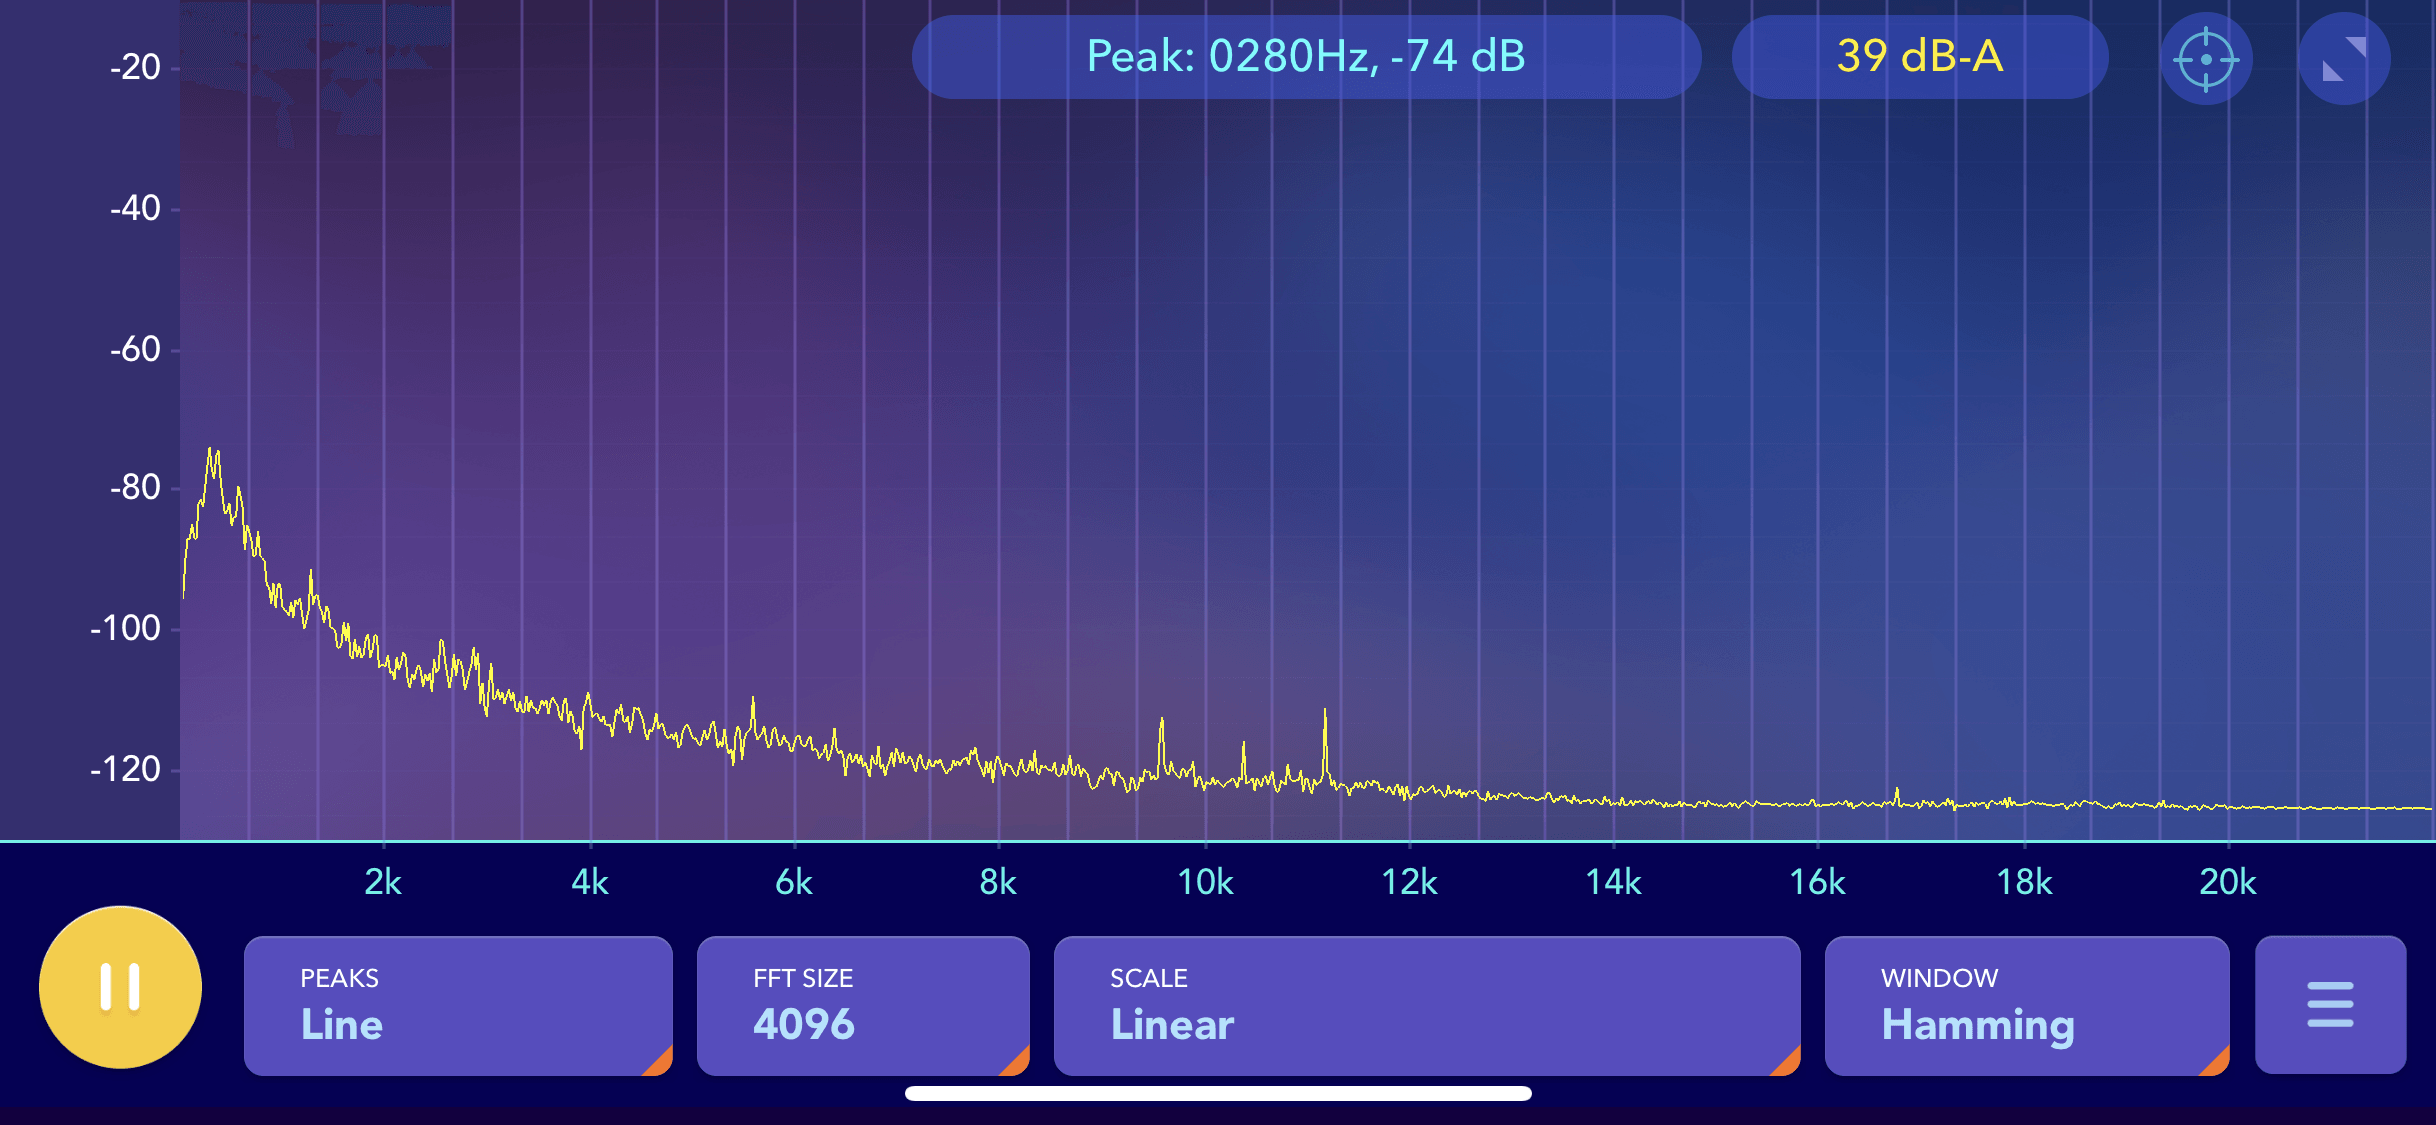
Rough acoustic plots captured with my phone (so take them with a large pinch of salt) at 50cm distance. The Sunon is noticeably louder with a high frequency, it also overspeeds during startup while the Noctua rises gently.
With a handheld decibel meter, the Sunon was 12dBA louder than ambient, and the Noctua was 7dBA louder. Anecdotally, the Sunon's wider spectrum of noise and higher pitch was more irritating, though it is pushing (apparently) a bit more air. Unfortunately both fans were too small/slow for me to measure the airflow.
| Ambient | Sunon | Noctua |
|---|---|---|
|

|

|
Hopefully these figures are interesting for someone. The actual swap process was easy enough, I swapped the fan connector onto the Sunon to fit back into the PSU and reduced the cable length.
I'm sure the Sunon fan is probably fine, but I'm glad I swapped it out. Thermally, the PSU seems to run around 5-8C hotter than ambient for a 50W load with the Noctua, which is fine.
The PC Build
The actual build isn't very notable, other than the fact that NVMe M.2 SSD's make ITX installs much cleaner. The case has 2x 2.5in drive bays which I wired up but aren't in use yet.
The AMD cooler had a cosmetic ring which needed to be removed to clear the lid. Wiring was a bit tight, but pushed into the small front gap reasonably easily.

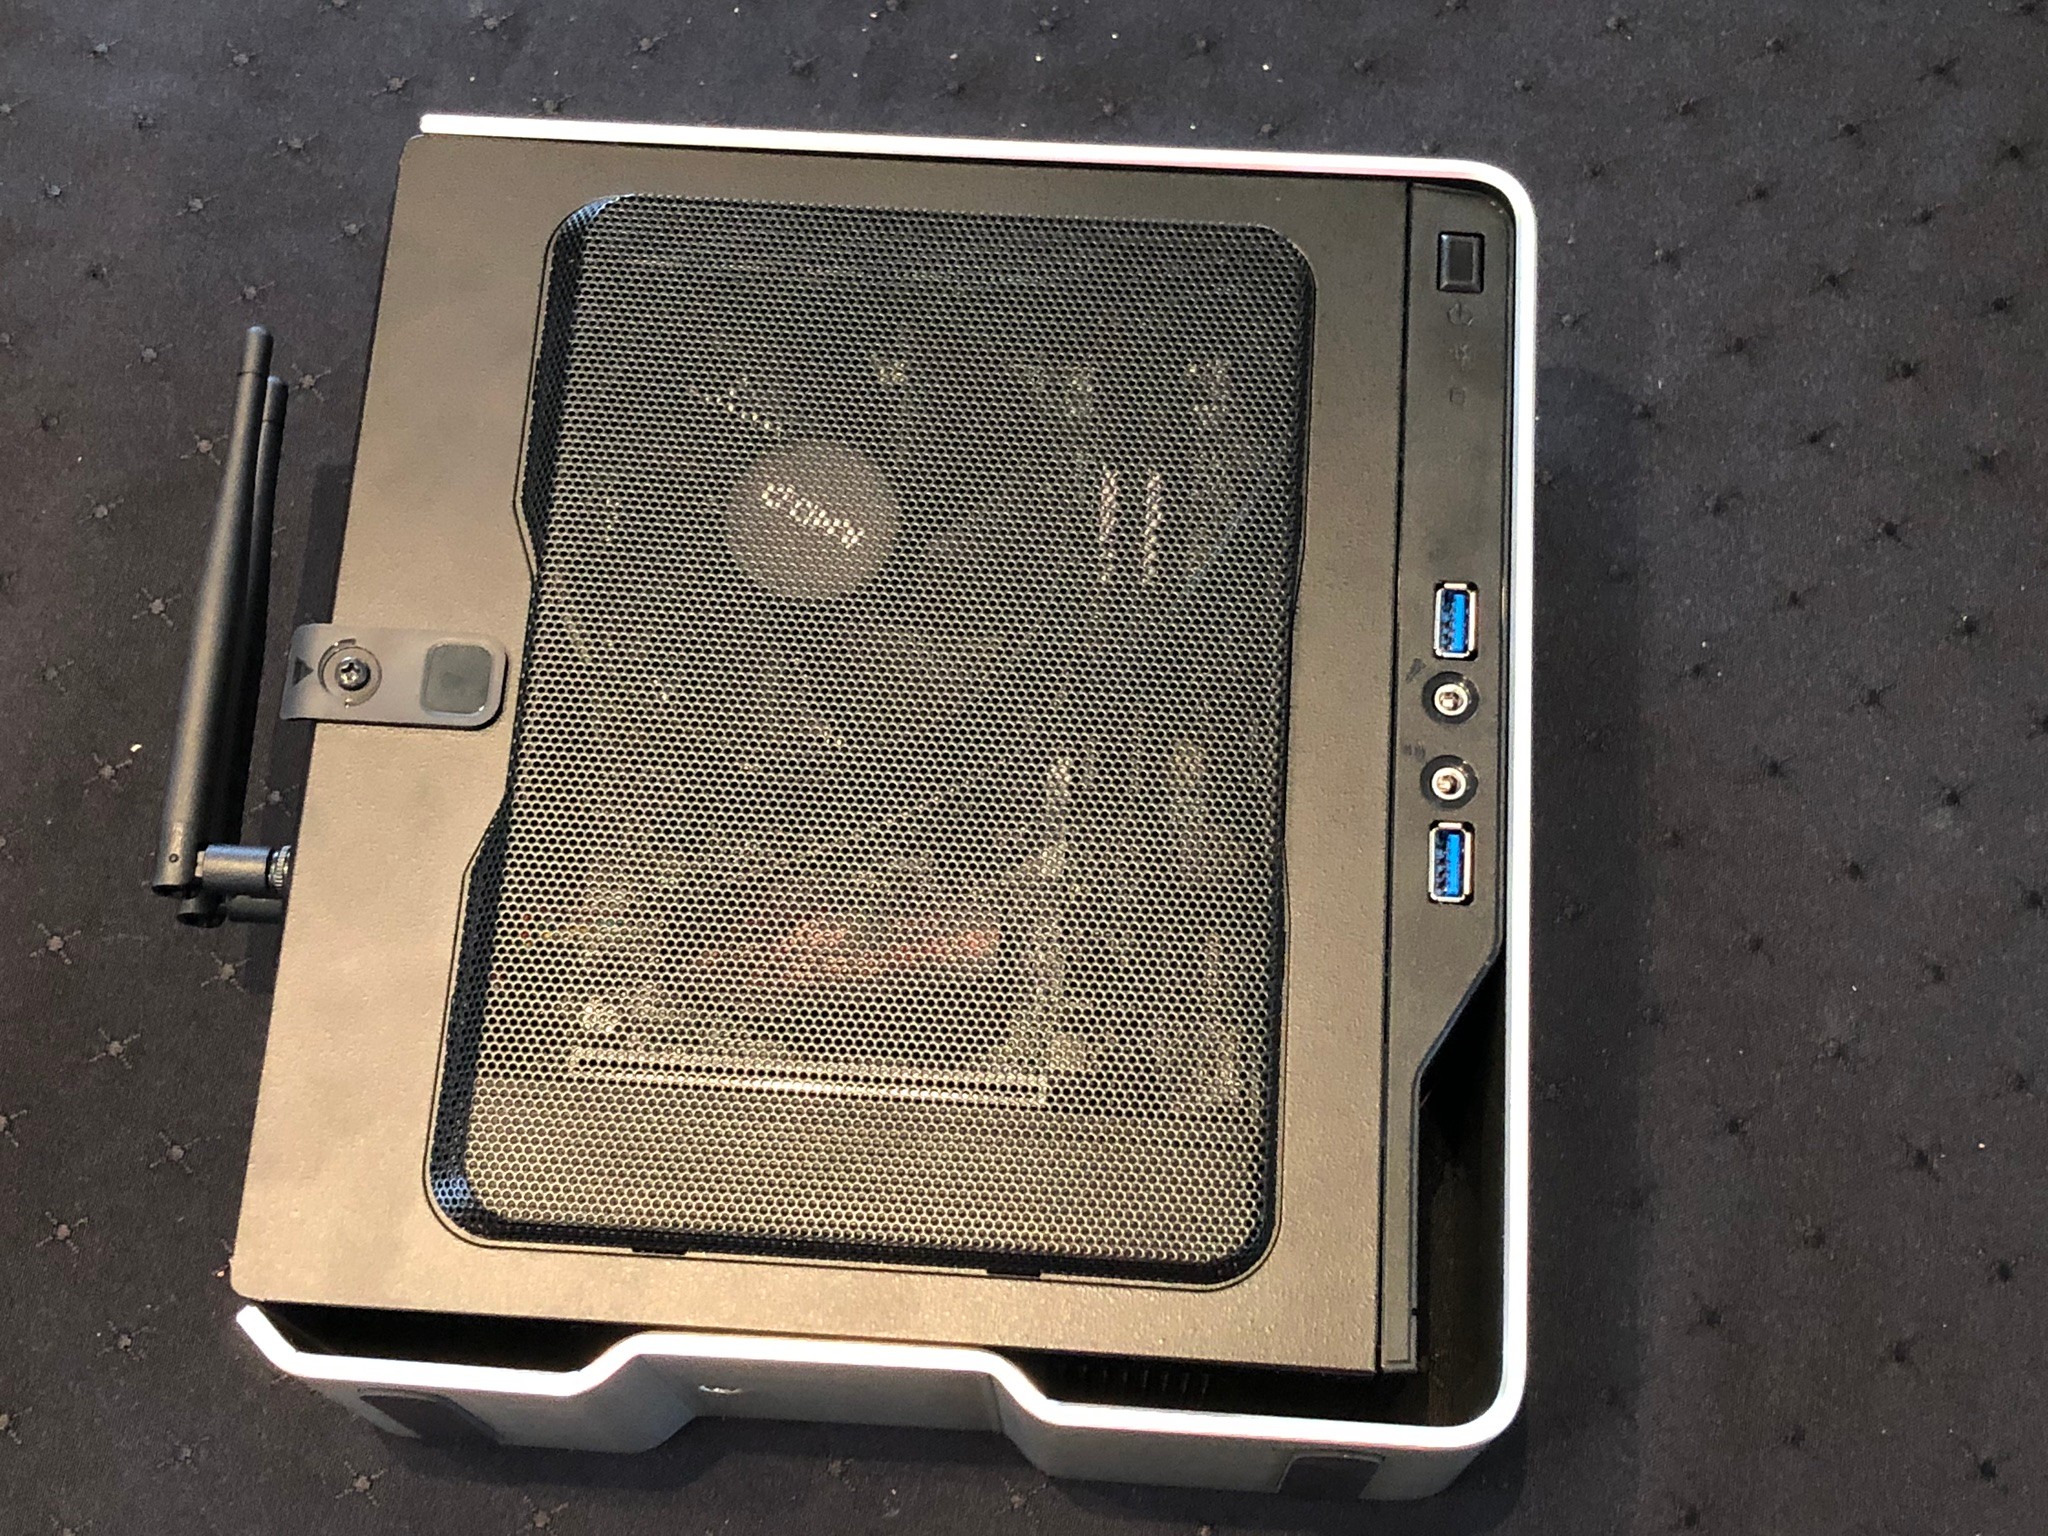
The build is complete, and a Lubuntu 18.10 image was installed as the host OS. The server was then tucked away with a UPS in a corner and assigned a static IP address. All fairly standard stuff.
Test Hardware
After the build server was finished hardware wise, I mapped out the serial numbers for a set of our Electric UI hello-sticks which would be assigned to a few VM's for HiTL tests. At least one stick is assigned to each of our target OS's, with our nix build agent getting a few more to let us test multiple-device functionality.
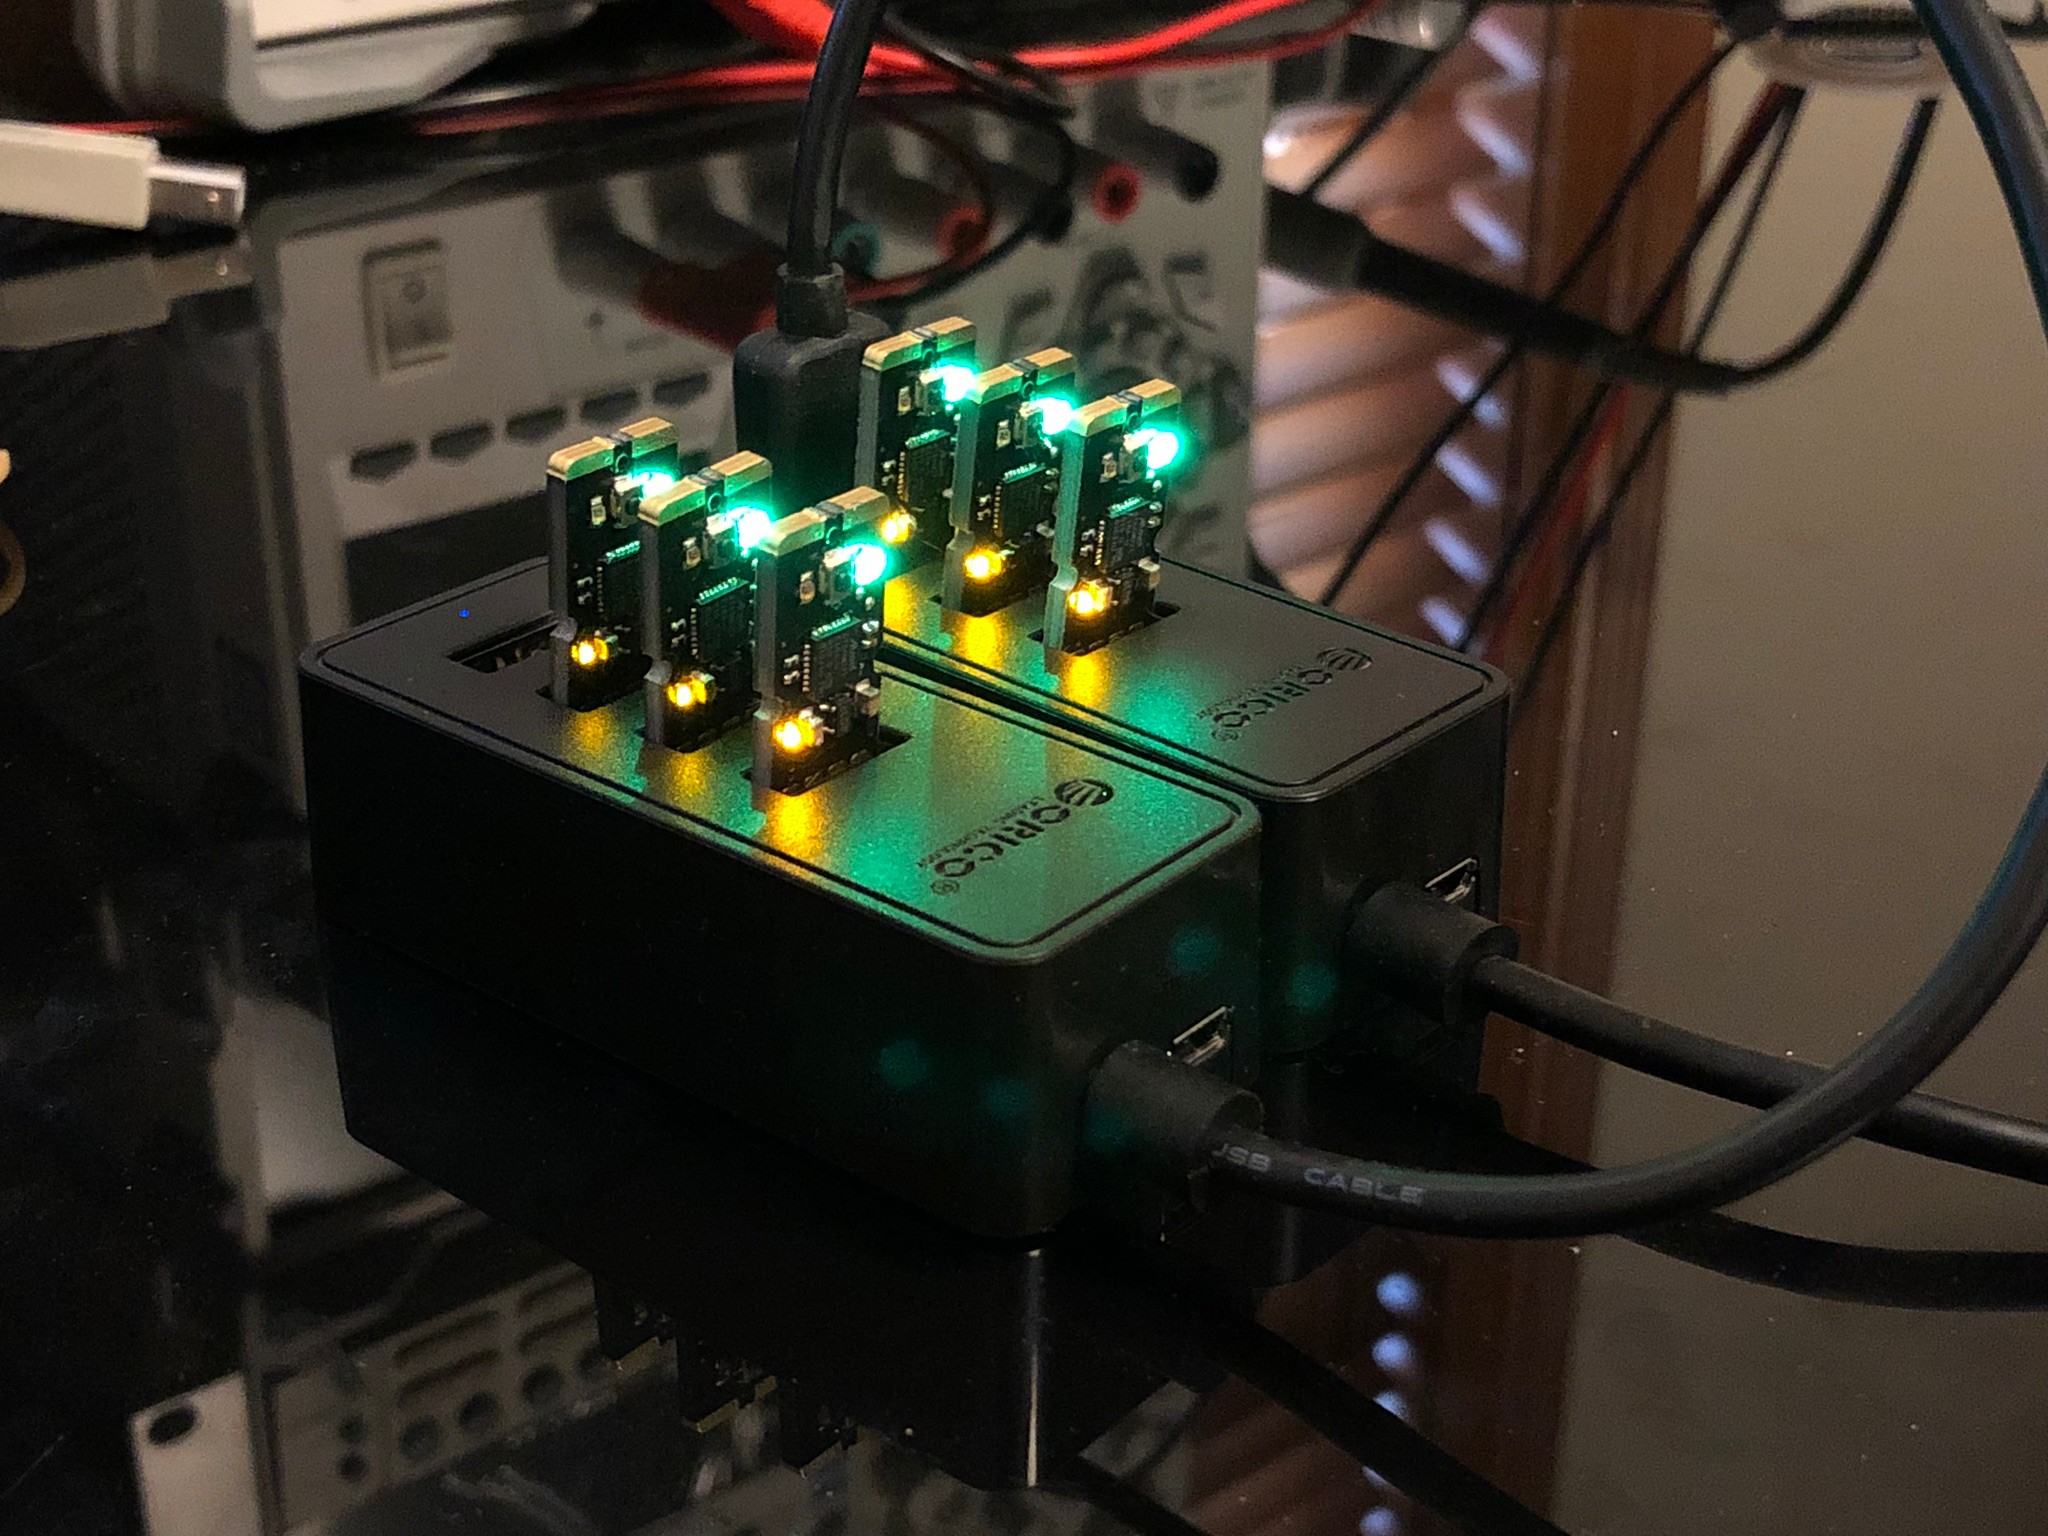
These sticks are based on the Adafruit Trinket M0 design, with some tweaks to the hardware to provide a little bit of standalone onboarding hardware for Electric UI.
While the sticks provide a device to the HITL or integration tests, its important to validate that the hardware is doing what we expect. To solve this issue, I quickly made a small board which allows for the test hardware pin-state to be queried with HTTP GET requests over an Ethernet interface.
Using the Ethernet equipped micro-controller, we can use Electric UI to manipulate a pin on our test micro-controller, then query the state of the pin through a stable, known working interface to determine if our code is working.
This concept is essentially the same for more complex test behaviours.
Infrastructure as code
Because it can be easy to forget how a machine was setup, or configured, I handle the entire process through a shell script, and once everything is running, wipe the machine to ensure deterministic repeats if needed. This means I can see exactly what's been done when I forget in 3 months, and can easily rebuild the machine on basically any computer which presents a Debian compatible host OS.
Remote Access
The machine is put on a VLAN which includes the build server and a secondary interface on my main workstation. This prevents the build server from seeing the NAS, phones/media devices and personal workstations.
As a general rule, machines should only provide access via SSH with a key, passwords and remote root access aren't allowed. With SSH forwarded to the internet on a unique port, we use SSH's port forwarding to access the various internally hosted services remotely, even if we are in the same physical building as the build server.
First setup steps...
The system needs git installed and our internal repo pulled, and everything afterwards is automated to be as hands-off as practical. Some parts of the GoCD server config and specific VM's need manual one-time confirmations and keys added which were too hard to automate or present security risks when stored in git.
We install docker, vagrant, virtualbox-6 and virtualbox-guest-extensions, along with some general config as below:
#!/usr/bin/env bash# Script intended to run on the host OS only (typically ubuntu/debian based)# This script assumes a username of "arthur", change to suit actual username# Setup SSH, VNC, UPS config, user accounts etc as required### REDACTED #### Allow APT to use HTTPS 3rd party repossudo apt-get install apt-transport-https ca-certificates curl gnupg-agent software-properties-common# Add docker's GPG key, then the stable docker repo, then install itcurl -fsSL https://download.docker.com/linux/ubuntu/gpg | sudo apt-key add -sudo add-apt-repository "deb [arch=amd64] https://download.docker.com/linux/ubuntu $(lsb_release -cs) stable"sudo apt-get updatesudo apt-get install docker-ce docker-ce-cli containerd.io# Install vagrant from downloadwget https://releases.hashicorp.com/vagrant/2.2.3/vagrant_2.2.3_x86_64.debsudo apt-get install ./vagrant_2.2.3_x86_64.deb# Add virtualbox to the package manager and install itsudo echo "deb https://download.virtualbox.org/virtualbox/debian cosmic contrib" >> /etc/apt/sources.listsudo apt-get updatesudo apt-get install virtualbox-6.0# Install the virtualbox extensions pack on the host for usb access etc.LatestVirtualBoxVersion=$(wget -qO - http://download.virtualbox.org/virtualbox/LATEST-STABLE.TXT) && wget "http://download.virtualbox.org/virtualbox/${LatestVirtualBoxVersion}/Oracle_VM_VirtualBox_Extension_Pack-${LatestVirtualBoxVersion}.vbox-extpack"yes | sudo VBoxManage extpack install --replace Oracle_VM_VirtualBox_Extension_Pack-${LatestVirtualBoxVersion}.vbox-extpack# Permissions for the virtualboxes to get access to USB devicessudo usermod -a -G vboxusers arthur# Install vagrant plugin to make virtualbox guest additions easier to managevagrant plugin install vagrant-vbguest# Docker user permissionssudo groupadd dockersudo usermod -aG docker arthursudo systemctl enable docker# Create the docker bridge networkdocker network create -d bridge --gateway=192.168.20.1 --subnet=192.168.20.1/24 dockerbridge# Export it as an env varexport DOCKER_BRIDGE_ID=$(docker network ls | grep dockerbridge | grep -Eo '^[^ ]+')echo "Now run 'vagrant up' to get running!"I also have a startup.sh which is set to run on machine boot, this just exports the DOCKER_BRIDGE_ID network information to an environment variable for vagrant to grab, needed when restarting.
Vagrant
To manage the virtual machines I decided to try Vagrant, which is designed to manage virtual machines and containers. There are pre-made OS images available for download and Vagrant handles the tricky bits like setting up the VirtualBox config, virtualised networks, and can run provisioning scripts on the various guest OS's.
- GoCD Server on Ubuntu 18.10
- Ubuntu 18.10 GoCD Build Agent
- Windows 10 GoCD Build Agent
- macOS 10.14 GoCD Build Agent
- Docker based GoCD Build Agents (18.04 based) (x 2)
- Docker containers for a NPM proxy, NPM registry, Postgres database, and instance of our internal
bolttooling. - Other test OS's as needed...
This is roughly what our configuration looks like (with some bits removed for brevity & security). The docker containers are mostly the same from vagrant's perspective, with details inside each container's dockerfile.
# -*- mode: ruby -*-# vi: set ft=ruby :# Crude Ruby to generate the docker bridging IP argument for use during network configdocker_output = open("|docker network ls | grep dockerbridge | grep -Eo '^[^ ]+'")docker_bridge_cmd = "br-" + docker_output.read()Vagrant.configure("2") do |config| # GoCD Host OS config.vm.define "gocd" do |gocd| gocd.vm.box = "bento/ubuntu-18.10" gocd.vm.hostname = 'gocd' # Share host's ssh keys with the guest gocd.ssh.forward_agent = true gocd.vm.network :private_network, ip: "192.168.10.100" gocd.vm.network :forwarded_port, guest: 22, host: 10022 # Forward the GoCD WebUI ports gocd.vm.network :forwarded_port, guest: 8153, host: 8153 gocd.vm.network :forwarded_port, guest: 8154, host: 8154 gocd.vm.provider :virtualbox do |v| v.customize ["modifyvm", :id, "--natdnshostresolver1", "on"] v.customize ["modifyvm", :id, "--memory", 1536] v.customize ["modifyvm", :id, "--name", "gocd"] end gocd.vm.provision "shell", path: "gocd/setup.sh" end # Windows Build Agent config.vm.define "win" do |win| win.vm.box = "gusztavvargadr/windows-10" win.vm.hostname = 'win' win.vm.guest = :windows # Set the windows remote access type, ssh not available by default on win win.vm.communicator = "winrm" win.vm.network :private_network, ip: "192.168.10.103" win.vm.network :forwarded_port, guest: 22, host: 10322 win.vm.synced_folder "persistent/tools", "/persistent-tools" win.vm.provider :virtualbox do |v| v.customize ["modifyvm", :id, "--natdnshostresolver1", "on"] v.customize ["modifyvm", :id, "--memory", 3072] v.customize ["modifyvm", :id, "--name", "win"] v.customize ["modifyvm", :id, "--cpus", "2"] v.customize ["modifyvm", :id, "--usb", "on"] v.customize ["usbfilter", "add", "0", "--target", :id, "--name", "Hello-Stick-2", "--serialnumber", "C0CA9E63504E4B36322E3120FF15113F"] end # Powershell provisioning script gets things ready win.vm.provision "shell", path: "win/provision.ps1", privileged: true end # macOS Build Agent ### REDACTED ### # Docker based node and go build worker config.vm.define "buildworker1" do |buildworker1| buildworker1.vm.hostname = 'buildworker1' buildworker1.vm.network :private_network, ip: "192.168.10.105" buildworker1.vm.network :private_network, ip: "192.168.20.105", bridge:"#{docker_bridge_cmd}" buildworker1.vm.network :forwarded_port, guest: 22, host: 10522 buildworker1.vm.synced_folder "persistent/tools", "/persistent-tools" buildworker1.vm.provider "docker" do |d| d.build_dir = "buildworker/" d.create_args = [ "--network", "dockerbridge", # Jump on the docker bridge network "--ip", "192.168.20.105", # Set the IP at the .20. network "--add-host", "npmproxy.local:192.168.20.106", # npmproxy.local:4873 is the local proxy "--add-host", "npmregistry.local:192.168.20.110", # npmregistry.local:4874 is the local production registry "--add-host", "postgres.local:192.168.20.107", # postgres.local:5432 is the local db "--add-host", "bolt.local:192.168.20.109", # bolt.local:8080 is the local bolt ] end end # Docker based node and go build worker #2 # Just another docker container, same as #1 setup # NPM Proxy # Just another docker container # Postgres database server # Just another docker container # A local copy of Bolt # Just another docker container # Linux Build Agent config.vm.define "nix" do |nix| nix.vm.box = "bento/ubuntu-18.10" nix.vm.hostname = 'nix' nix.vm.network :private_network, ip: "192.168.10.102" nix.vm.network :forwarded_port, guest: 22, host: 10222 nix.vm.provider :virtualbox do |v| v.customize ["modifyvm", :id, "--natdnshostresolver1", "on"] v.customize ["modifyvm", :id, "--memory", "2048"] v.customize ["modifyvm", :id, "--name", "nix"] v.customize ["modifyvm", :id, "--cpus", "2"] v.customize ["modifyvm", :id, "--usb", "on"] v.customize ["usbfilter", "add", "0", "--target", :id, "--name", "Hello-Stick-0", "--serialnumber", "4E7B8E23504E4B36322E3120FF15083A"] v.customize ["usbfilter", "add", "1", "--target", :id, "--name", "Hello-Stick-1", "--serialnumber", "4A4BFD01504E4B36322E3120FF192006"] end nix.vm.provision "shell", inline: <<-SHELL /vagrant/nix/setup.sh SHELL endendEach OS gets a config folder in the git repo with a specific provisioning script and other supporting files, and these are passed into the guest OS by Vagrant, doing things like installing packages, configuring GoCD agents etc.
While the scripts, configuration and general system design took a few days to work out properly, now we can just run vagrant up and the OS images are downloaded, configured and start running in the space of a few minutes.
GoCD
With everything setup properly, the GoCD server hosts a webpage on http://localhost:8153/go which is the main interface.
We keep a copy of our GoCD config file in our git repo, and this is copied onto the master VM as part of the server provisioning.
We've also setup a Slack build notification plugin which posts to a channel when builds change their status.
Agents
Because the GoCD server and the build agents all share a common virtualised network, the agents are seen by the server and adopted into the agent pool. From here we assign specific resources to each agent, allowing jobs to pick a given agent based on the software stack, OS, and connected test hardware.
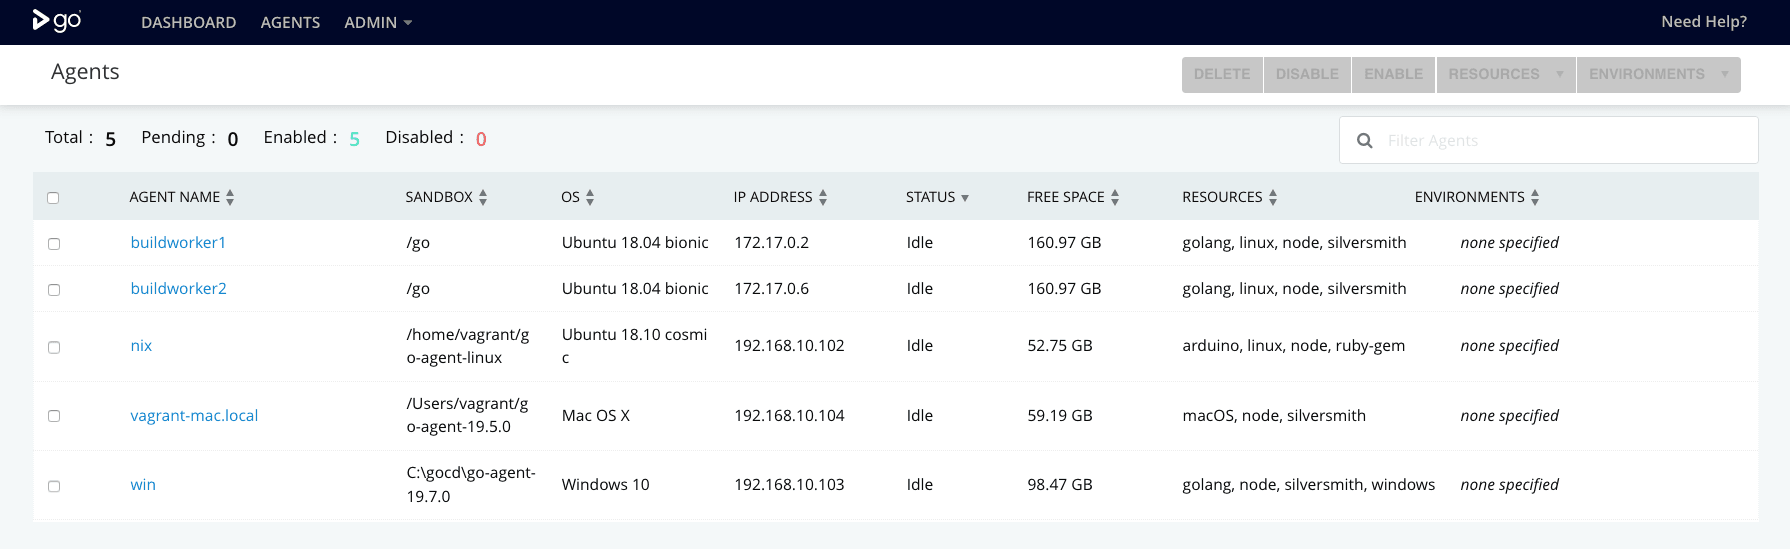
This is one of the stronger features of GoCD, though Gitlab and TeamCity both offer similar behaviour as the default model.
Setting up tests
The process is fairly straightforward, and better explained by the GoCD docs.
- Add a material (source of data) such as Github
- Define stages, serial processes pass build products between each other
- Define Jobs for each stage (jobs run in parallel)
- Define Tasks for each Job (individual bash commands run serially)
Adding a Github repository was reasonably easy when using HTTPS login and a token, but I would have preferred to have the GoCD server use ssh keys to gain access instead, as vagrant supports keychain passthrough to guests. This would have meant that no secure credentials needed to be entered into any guests. It didn't work for me after 4-6 hrs of debugging, so I just do this small stage manually.
Once the Github material is added for a given pipeline, its fairly easy to enter the various commands needed to run tests. In most cases, our repositories are self-contained and include setup scripts to install deps if the language's tooling doesn't handle that.
In the case of the electricui-embedded tests, it runs through my Ceedling installation/bootstrapping script, then runs tests, and performs a gcov analysis pass to check test coverage.
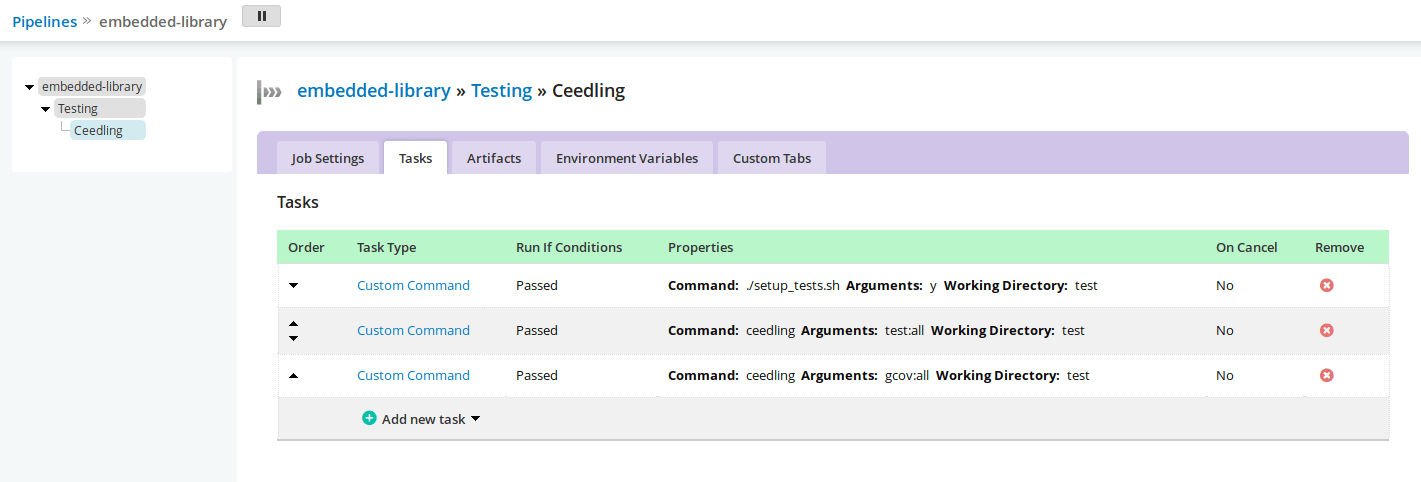
When run, this gives the following output (though the outputs from each Task command are available with an expanding dropdown)
[go] Job Started: 2019-03-13 01:06:32 UTC[go] Start to prepare embedded-library/14/Testing/1/Ceedling on nix [/var/lib/go-agent][go] Cleaning working directory "/var/lib/go-agent/pipelines/embedded-library" since stage is configured to clean working directory[go] Start to update materials.[go] Start to build embedded-library/14/Testing/1/Ceedling on nix [/var/lib/go-agent][go] Task: ./setup_tests.sh ytook: 1.454s[go] Task: ceedling test:alltook: 4.414s[go] Task: ceedling gcov:alltook: 4.214s[go] Current job status: passed[go] Start to create properties embedded-library/14/Testing/1/Ceedling on nix [/var/lib/go-agent][go] Start to upload embedded-library/14/Testing/1/Ceedling on nix [/var/lib/go-agent][go] Job completed embedded-library/14/Testing/1/Ceedling on nix [/var/lib/go-agent]Our pipelines look something like this
Review
It took about 2 working weeks from hardware orders, to the running GoCD server with agents. I learnt Vagrant, Docker, GoCD and a some newer concepts regarding Linux server management.
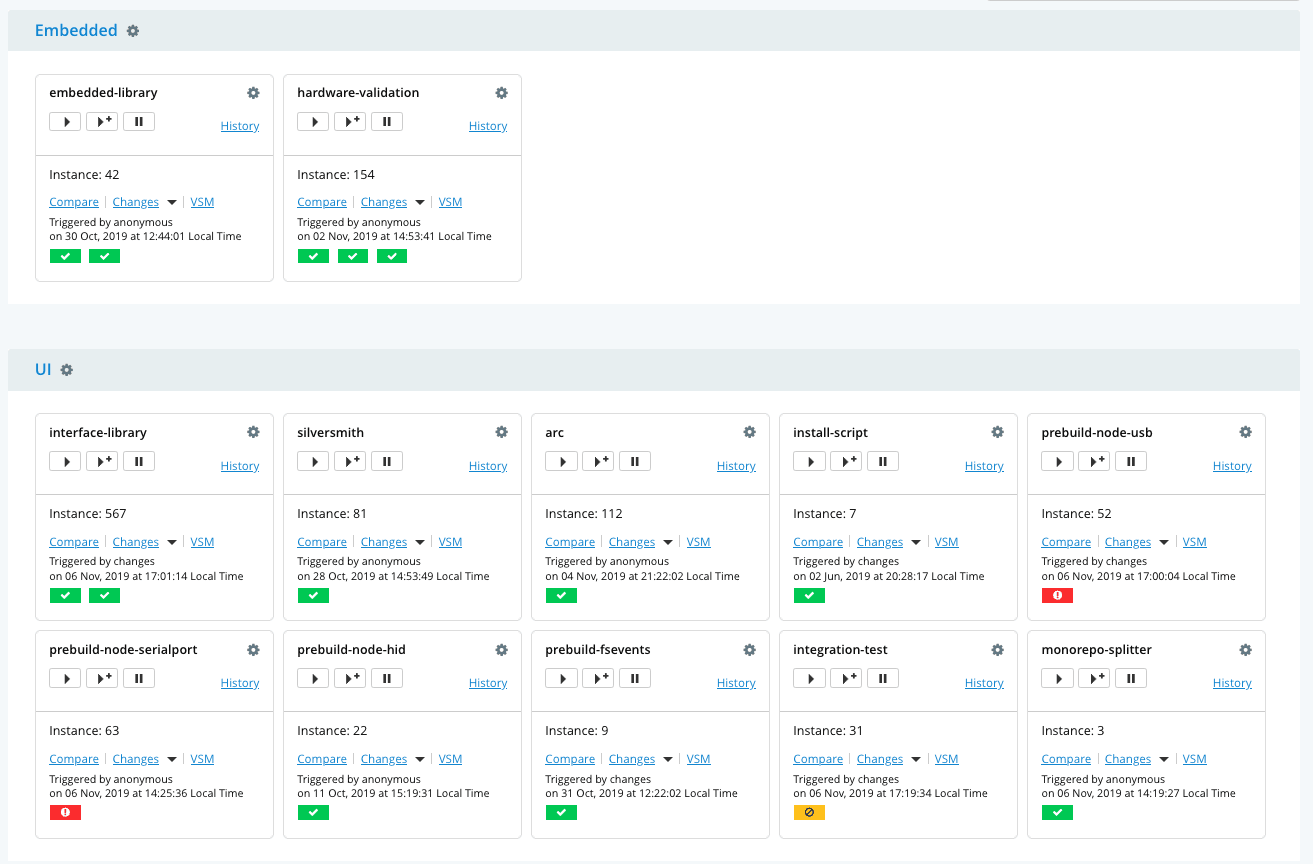
The system seems to be to perform well enough for the current set of 12 environments, idling around 14GB of RAM usage. We've allocated about 350GB of storage, though lots of this is to virtual machines which aren't actually using it.
It draws 19W from the wall while idle, and runs around 50-60W during a typical set of UI tooling tests. At full CPU load, I've seen it hit 102W as we don't stress the GPU.
The machine should easily pay itself off over 4-5 months when compared against cloud CI plans (with lower parallelism).
Hindsight
I would have started using docker earlier, put the GoCD server in a docker container instead of a 'fat' Ubuntu vm for better efficiency, and attempted to run the embedded tests in docker as well.
I don't enjoy debugging the windows VM provisioning process or virtualised network interoperability between docker and Virtualbox vm's.
Windows has been a pain for me, edge cases are sharp and it takes about two orders of magnitude longer to start/provision than the Ubuntu VMs. Chocolatey helps with managing software installs during provisioning, and a reasonably simple Powershell script was enough to provision the box. I had lots of issues installing the gocd-agent from the Powershell script, as it seemed like the user needed to be logged in through the GUI for it to successfully install.
I strongly recommend setting up and using NFS shares for Virtualbox VM's, as the performance improvements are massive, and are the only way to provide shared filesystem access with macOS.
Continued Reading
This covers the setup of the build server, but what we're doing with it is the more interesting part.