RP2040
Electric UI integrates with your Raspberrry Pi Pico C/C++ projects easily. Integrate electricui-embedded to control a flashing LED from the template UI.
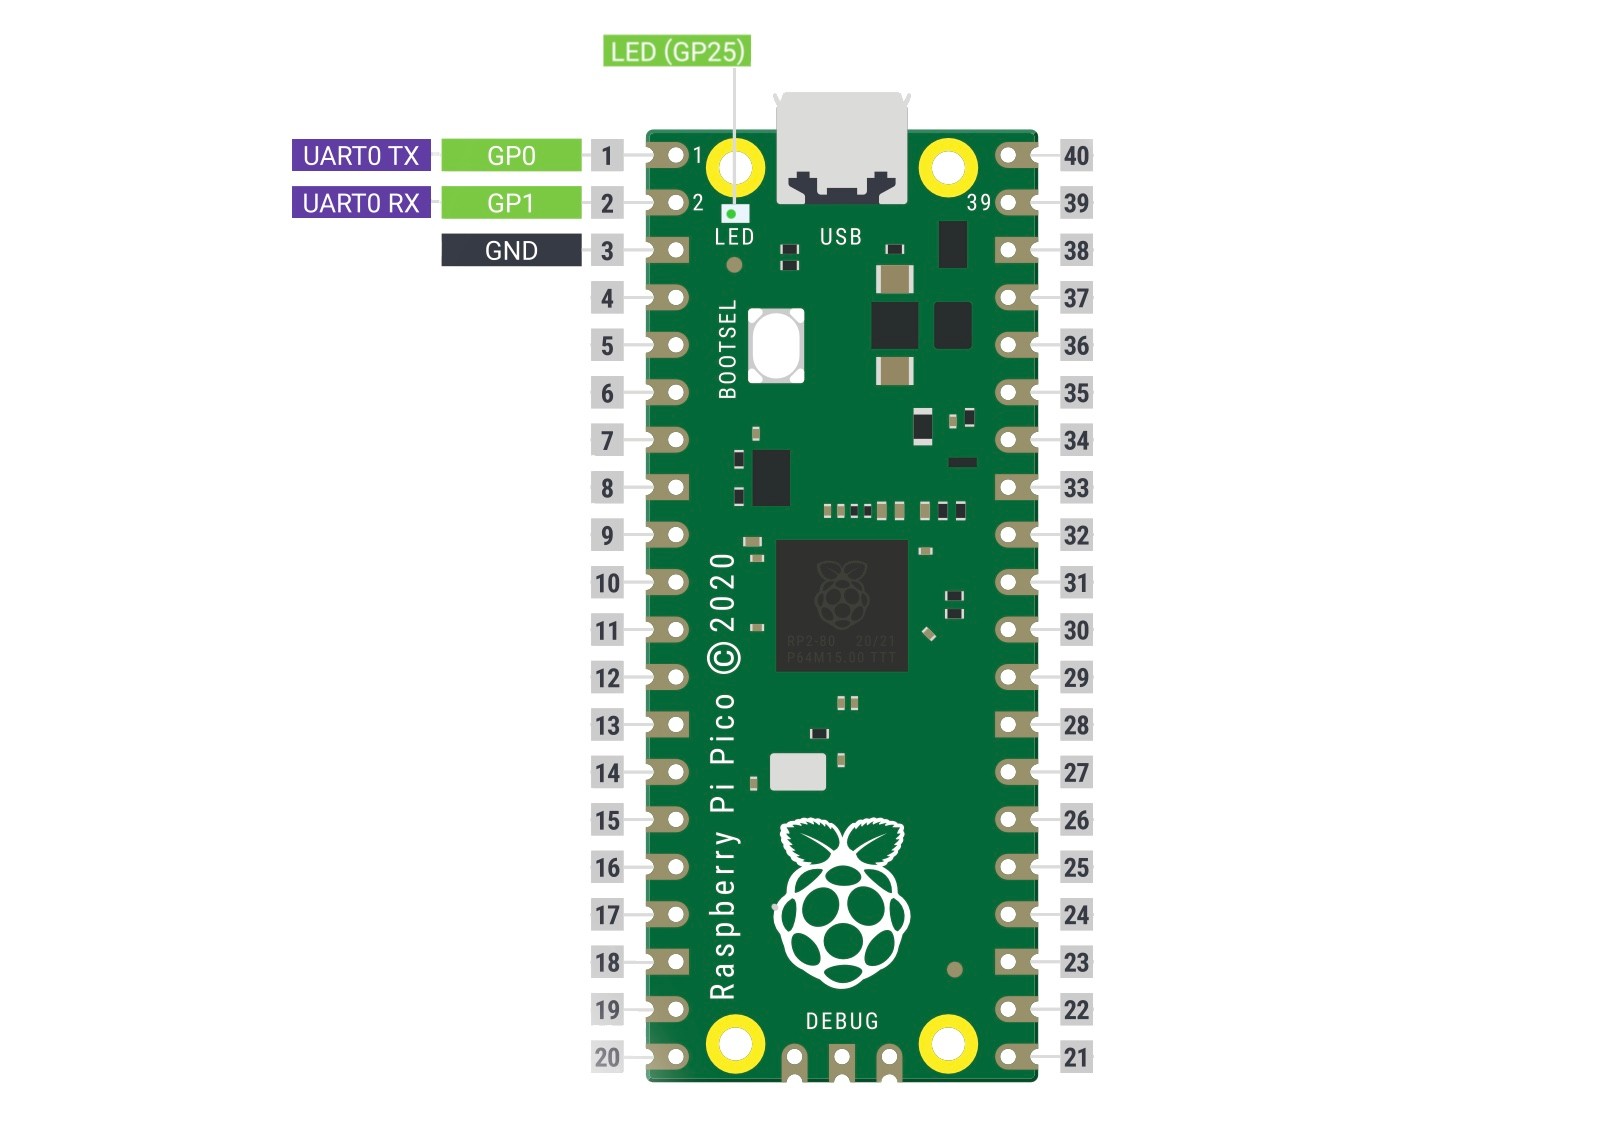
This guide assumes a Raspberry Pi Pico - RP2040 board, with a USB-UART adapter connected to GP0 and GP1.
Note: This guide is intended for use the Raspberry Pi Pico C/C++ SDK, not MicroPython.
If MicroPython support is important to you, let us know.
Project Creation
If you haven't successfully flashed a basic LED blink program to your board, you should setup your development environment. The Official Rasberry Pi Getting Started Guide is the best place to start.
This guide assumes you know how to build your project, and flash the firmware file to hardware (via U2F, or through SWD).
Once you're familiar with the basics, we'll create a new project called hello-blink, add a blank source and CMake file, and copy in the pico_sdk_init.cmake file.
This is done the same way as "Chapter 7. Creating your own Project" in the getting started guide.
From your terminal, run
mkdir hello-blinkcd hello-blinktouch main.c CMakeLists.txtmkdir buildcp ../pico-sdk/pico_sdk_init.cmake .Download the electricui-embedded library from our Github repository:
git clone https://github.com/electricui/electricui-embedded.gitor click "Download zip" on the Github page and move the folder into the hello-blink directory.
The hello-blink project folder should look something like this:
├── build├── CMakeLists.txt├── electricui-embedded│ ├── CMakeLists.txt│ ├── ...│ └── src│ ├── electricui.c│ ├── electricui.h│ └── ...├── main.c└── pico_sdk_import.cmakeWith everything in place, open the hello-blink directory in your editor of choice so we can setup our project's build system and tell cmake how to include the library.
Edit the hello-blink/CMakeLists.txt file.
cmake_minimum_required(VERSION 3.13)include(pico_sdk_import.cmake)project(hello-blink-project)pico_sdk_init()add_executable( hello-blink main.c)pico_enable_stdio_usb(hello-blink 1)pico_add_extra_outputs(hello-blink)add_subdirectory(electricui-embedded)target_link_libraries(hello-blink pico_stdlib pico_unique_id electricui )This is similar to a bare project, the only differences are:
- We added a
add_subdirectory(electricui-embedded)line which lets us interact with files in theelectricui-embeddedfolder. - The
target_link_libraries()gets an additionalelectricuilibrary entry - letting the build process include the code in the library.
We also added the pico_unique_id library, we'll use that to get the board's unique identifier later on.
Non-blocking Blink firmware
We'll write some simple firmware which lets the UI control a blinking light on the Pico using serial communication. First we'll get the blinking LED working, then add the UI communication.
Edit main.c with the basic skeleton of our project:
#include <stdio.h>#include "pico/stdlib.h"#include "hardware/gpio.h"#include "hardware/uart.h"#include "hardware/timer.h"const uint8_t LED_PIN = 25;int main(){ stdio_init_all(); // Configure the onboard LED gpio_init( LED_PIN ); gpio_set_dir( LED_PIN, GPIO_OUT ); // UART0 on pins GP0 and GP1 uart_init(uart0, 115200); gpio_set_function(0, GPIO_FUNC_UART); gpio_set_function(1, GPIO_FUNC_UART); while( true ) { }}Now lets add our blinking LED.
Unlike the Blink example provided in the getting started guide, we won't be using sleep_ms() because it prevents the Pico from doing any other work while it waits.
This is called a "blocking delay", and you want to avoid blocking waits on embedded systems wherever possible.
Instead, we'll use the timer library to get the number of microseconds since the Pico started (a timestamp), and do a simple check to see if the LED needs to turn on or off.
Under the LED_PIN definition, we'll add some extra variables.
uint8_t blink_enable = 1; // if the blinker should be runninguint8_t led_state = 0; // track if the LED is illuminateduint16_t glow_time = 200; // in millisecondsuint32_t led_timer = 0; // track when the light turned on or offThen, in our main() we'll toggle the LED when the glow_time duration has elapsed:
led_timer = us_to_ms( time_us_32() );while( true ){ if( blink_enable ) { uint32_t time_ms = us_to_ms( time_us_32() ); // Check if the LED has been on for the configured duration if( time_ms - led_timer >= glow_time ) { led_state = !led_state; //toggle the led led_timer = time_ms; } } gpio_put( LED_PIN, led_state );}Now lets add UI control over the glow_time variable, and let the UI plot the led_state value.
Integrating electricui-embedded
We'll include the electricui-embedded library and the unique_id library now.
#include "pico/unique_id.h"#include "electricui.h"To make sharing data with the UI easier, the library provides helpers which operate around the concept of tracking your variables. By providing a name and giving the library a pointer to your variables, it will manage the details of handing inbound requests, handling changes, and responding to the UI.
Above the main(), we'll declare a function used by the library to send data, and describe our tracked variables.
void eui_write( uint8_t *data, uint16_t size );eui_interface_t serial_comms = EUI_INTERFACE( &eui_write );eui_message_t tracked_variables[] ={ EUI_UINT8( "led_blink", blink_enable ), EUI_UINT8( "led_state", led_state ), EUI_UINT16( "lit_time", glow_time ),};// This function is called by eUI to send data to the PCvoid eui_write( uint8_t *data, uint16_t size ){ for( uint16_t i = 0; i < size; i++ ) { uart_putc_raw( uart0, data[i] ); }}There's a little bit of setup to do when the microcontroller starts up. Under the UART setup in main() we'll give the library the serial_comms interface and the tracked_variables.
While it's not required, it's good practice to grab the Pico's unique serial number and give that to Electric UI to act as our board ID. This lets the UI tell the difference between microcontrollers if many are connected at once.
int main(){ // ... IO and UART setup // Setup eUI's interface and tracked variables eui_setup_interface( &serial_comms ); EUI_TRACK( tracked_variables ); // Get the UUID from the micro's flash chip, pass it to eUI pico_unique_board_id_t board_id; pico_get_unique_board_id(&board_id); eui_setup_identifier((char *)&board_id.id, PICO_UNIQUE_BOARD_ID_SIZE_BYTES ); led_timer = us_to_ms( time_us_32() ); // ...The only thing missing, is to send the inbound serial data to the library. In the while loop, check if there is serial data available. If there is data waiting in the receive buffer, pass it to eUI.
while( uart_is_readable( uart0 ) ){ eui_parse( uart_getc( uart0 ), &serial_comms );}Flashing
If you haven't yet, build the project
cd buildcmake ..makePlug the Pico in while holding the BOOTSEL button, then drag the hello-blink.uf2 onto the RPI-RP2 mounted disk to flash it.
That's it. The full project source is available on GitHub.
Now lets get a UI running with this firmware to test it out!
Raspberry Pi is a trademark of the Raspberry Pi Foundation