Interfacing with a Rotary Encoder
The quickstart guide covered the basics of connecting the UI sandbox with an Arduino and interacting with a flashing light. This guide goes a bit further with some more interesting hardware.
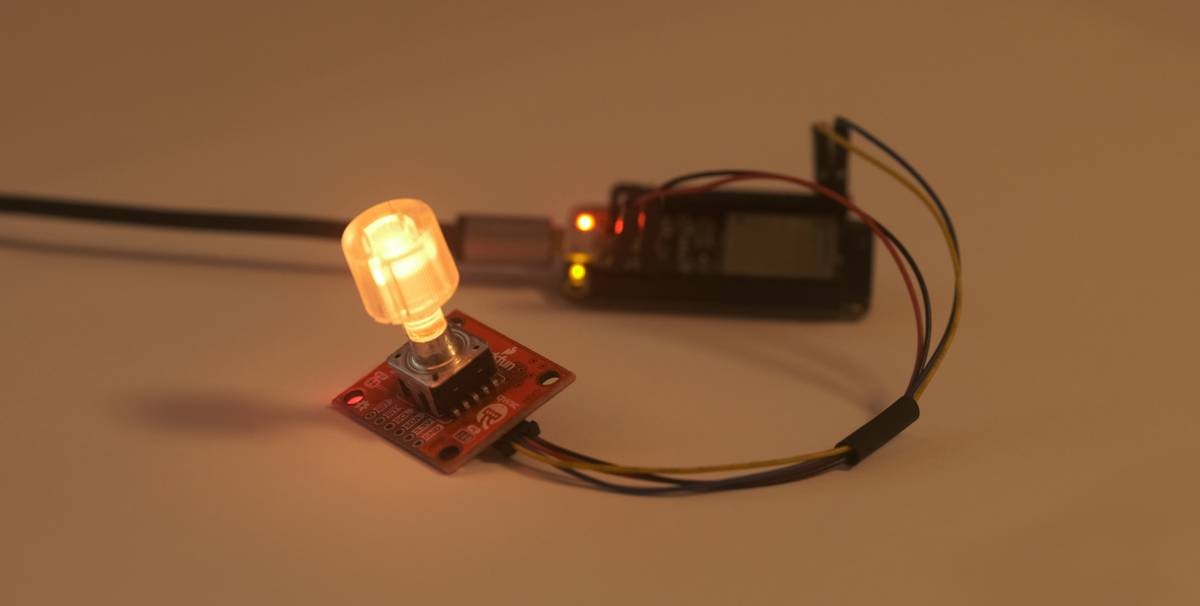
For this example, I'll be using an Arduino compatible board (Feather ESP32) and Sparkfun's Qwiic I2C encoder breakout board. The breakout includes a 24 position rotary encoder, push button and RGB led in the stem.
We'll implement the following:
- Ask the library for the encoder position and make it available to the UI with a tracked variable called
counts, - Implement a position zero function aka
home, using a callback function - Watch the integrated button for state changes
- Notify the UI immediately when the encoder or button state changes, rather than waiting for polling to occur.
If you're using a different encoder and library (or a different sensor entirely) the same general concepts should still apply to handling and zeroing the
count. You can skip the button handling parts!
Firmware
Using Sparkfun's Qwiic Twist library makes implementation with Electric UI pretty straightforward.
Starting with an empty Arduino sketch, import the encoder library and electricui-embedded, and add the serial handling behaviour needed for Electric UI that you should have seen in the quick-start guide:
#include "electricui.h"#include "SparkFun_Qwiic_Twist_Arduino_Library.h"TWIST twist; // Encoder twist library object// ------------------------------------------------------char nickname[] = "Encoder Demo";eui_interface_t serial_comms = EUI_INTERFACE( &serial_write ); eui_message_t tracked_variables[] = { EUI_CHAR_ARRAY_RO("name", nickname ),};// ------------------------------------------------------void setup(){ Serial.begin(115200); pinMode(LED_BUILTIN, OUTPUT); // eUI setup eui_setup_interface( &serial_comms ); EUI_TRACK( tracked_variables ); eui_setup_identifier( "knob", 4 ); // More setup code will go here later}void loop(){ serial_rx_handler(); // Code will go here}// ------------------------------------------------------void serial_rx_handler(){ while( Serial.available() > 0 ) { eui_parse( Serial.read(), &serial_comms ); // Ingest a byte }} void serial_write( uint8_t *data, uint16_t len ){ Serial.write( data, len ); // Output to the primary serial port/USB}Notice how we also declare the TWIST twist; object near the top of the skeleton - this is what we'll use to work with the rotary encoder library.
Reading Encoder Position
First, we need to setup the encoder in setup() using twist.begin() . This is done in a simple infinite retry loop here, but for a real project you should consider connecting and retrying with some way to gracefully handle failures.
// Encoder Connection while( !twist.begin() ){ // Blocking LED flash if the connection fails digitalWrite(LED_BUILTIN, HIGH); delay(80); digitalWrite(LED_BUILTIN, LOW); delay(150);}With setup working, we can attempt to read the encoder position in the loop() using twist.getCount().
First, create a new signed 32-bit integer variable counts near the top of your file,
#include "electricui.h"#include "SparkFun_Qwiic_Twist_Arduino_Library.h"TWIST twist; // Encoder twist library object// UI facing dataint32_t counts = 0;and then add it to the tracked variables array to allow the electricui-embedded library to handle the messaging behaviour.
eui_message_t tracked_variables[] = { EUI_CHAR_ARRAY_RO("name", nickname ), EUI_INT32( "pos", counts ),};Instead of blindly reading the encoder position into the tracked variable and sending it to the UI, it would be more efficient to check if the encoder value has changed and then send an update if it has.
This results in a more responsive UI experience and reduces the amount of background serial transfers would occur with just updating the value each loop. If you're using a different encoder library, you might need to write your own test to check if the position has changed between subsequent runs of the loop, but in this situation the Twist library lets us ask the encoder breakout directly:
// Check if the encoder has changed position if( twist.isMoved() ) { counts = twist.getCount(); eui_send_tracked("pos"); }If the encoder has changed value, we query it's position reference into the counts tracked variable, and then immediately send the new position to the UI over serial.
Pushbutton Status
Similar to the encoder position, we also want to report the button pressed 1 or released 0 state to the user interface. But this time we need to implement the change detection ourselves.
With two new boolean variables declared at the top,
bool pressed = false;bool wasPressed = false;we can add a simple check to our loop
// Check the button state pressed = twist.isPressed(); if( pressed != wasPressed ) // Update the UI when it changes { eui_send_tracked("button"); wasPressed = pressed; }Don't forget to track one of those variables for the UI. Variables using the bool type occupy a byte, which is the same thing as an unsigned 8-bit value for Arduino and embedded platforms, so we track it using the EUI_UINT8 macro.
eui_message_t tracked_variables[] = { EUI_CHAR_ARRAY_RO("name", nickname ), EUI_INT32( "pos", counts ), EUI_UINT8( "button", pressed ),};Adding a custom type
2 bytes of version information can be requested from the rotary encoder, expressed as major.minor i.e. 1.3.
Instead of sending those bytes through without formatting, we'll use a C structure to express the information in a more ergonomic manner.
typedef struct { uint8_t major; uint8_t minor;} version_info_t;version_info_t encoder_fw_version = { 0 };After connecting to the encoder in setup() we can request this information and store it in the encoder_fw_version structure,
// Get the encoder's version infouint16_t version_data = twist.getVersion();encoder_fw_version.major = version_data & 0xFF;encoder_fw_version.minor = version_data >> 8;Don't worry about the details of the bitmasking and shifts in this snippet - just extracting the lower byte into major, then the upper byte into minor as needed for this specific breakout.
All that's left is to add this structured data to the list of tracked Electric UI variables. Add a new entry to the eui_message_t array using the custom type. We'll also mark this data as read-only RO, as the UI shouldn't be able to modify the firmware version information.
eui_message_t tracked_variables[] = { // ... EUI_CUSTOM_RO( "ver", encoder_fw_version ),};We'll create a custom codec to handle decoding this data in the user interface section later.
Position Reset Callback
We want the UI to support a 'reset position' button to zero out the tracked encoder counts. One fast way to implement this behaviour is to create a new function in firmware that contains the necessary logic to reset the counts,
// UI callable function to zero the tracked positionvoid home_encoder( void ){ twist.setCount(0); // Zero the encoder's tracked value counts = twist.getCount(); // Update UI shared state eui_send_tracked("pos"); // Publish new value to UI}In this callback, we use the Twist library's setCount() method to request that the breakout board's controller set it's internal position reference to 0. We also refresh the eUI tracked variable to match the encoder's position.
We can make this function available to the UI as a callback by adding it to the list of tracked messages with the EUI_FUNC type,
eui_message_t tracked_variables[] = { // ... EUI_FUNC( "home", home_encoder ),};This function will be triggered by a button press in the UI.
Troubleshooting Tip!
In typical C or C++ you would normally declare public functions in the header file. The Arduino build process 'auto-magically makes it work' with a single sketch file.
If you get compiler warnings or have issues with this function with your microcontroller, try explicitly declaring the function signature near your variables at the top of the sketch:
Full Example Code
#include "electricui.h"#include "SparkFun_Qwiic_Twist_Arduino_Library.h"TWIST twist; // Encoder twist library object// UI facing dataint32_t counts = 0;bool pressed = false;bool wasPressed = false;typedef struct { uint8_t major; uint8_t minor;} version_info_t;version_info_t encoder_fw_version = { 0 };void home_encoder( void );// ------------------------------------------------------char nickname[] = "Encoder Demo";// Instantiate the communication interface's management objecteui_interface_t serial_comms = EUI_INTERFACE( &serial_write ); eui_message_t tracked_variables[] = { EUI_CHAR_ARRAY_RO("name", nickname ), EUI_INT32( "pos", counts ), EUI_UINT8( "button", pressed ), EUI_CUSTOM_RO( "ver", encoder_fw_version ), EUI_FUNC( "home", home_encoder ),};// ------------------------------------------------------void setup(){ Serial.begin(115200); pinMode(LED_BUILTIN, OUTPUT); // eUI setup eui_setup_interface( &serial_comms ); EUI_TRACK( tracked_variables ); eui_setup_identifier( "knob", 4 ); // Encoder Connection while( !twist.begin() ) { // Blocking LED flash if the connection fails digitalWrite(LED_BUILTIN, HIGH); delay(80); digitalWrite(LED_BUILTIN, LOW); delay(150); } // Connection ok! digitalWrite(LED_BUILTIN, HIGH); // Get the encoder's version info uint16_t version_data = twist.getVersion(); encoder_fw_version.major = version_data & 0xFF; encoder_fw_version.minor = version_data >> 8; // Set the knob led to green twist.setColor(0, 128, 0);}void loop(){ serial_rx_handler(); // Check if the encoder has changed position if( twist.isMoved() ) { counts = twist.getCount(); eui_send_tracked("pos"); } // Check the button state pressed = twist.isPressed(); if( pressed != wasPressed ) // Update the UI when it changes { eui_send_tracked("button"); wasPressed = pressed; }}// UI callable function to zero the tracked positionvoid home_encoder( void ){ twist.setCount(0); // Zero the encoder's tracked value counts = twist.getCount(); // Update UI shared state eui_send_tracked("pos");}// ------------------------------------------------------// eUI Serial Handlingvoid serial_rx_handler(){ while( Serial.available() > 0 ) { eui_parse( Serial.read(), &serial_comms ); // Ingest a byte }} void serial_write( uint8_t *data, uint16_t len ){ Serial.write( data, len ); // Output to the primary serial port/USB}User Interface
This is written assuming that a template has been prepared for development similar to the quickstart guide. You can use the same project if you want.
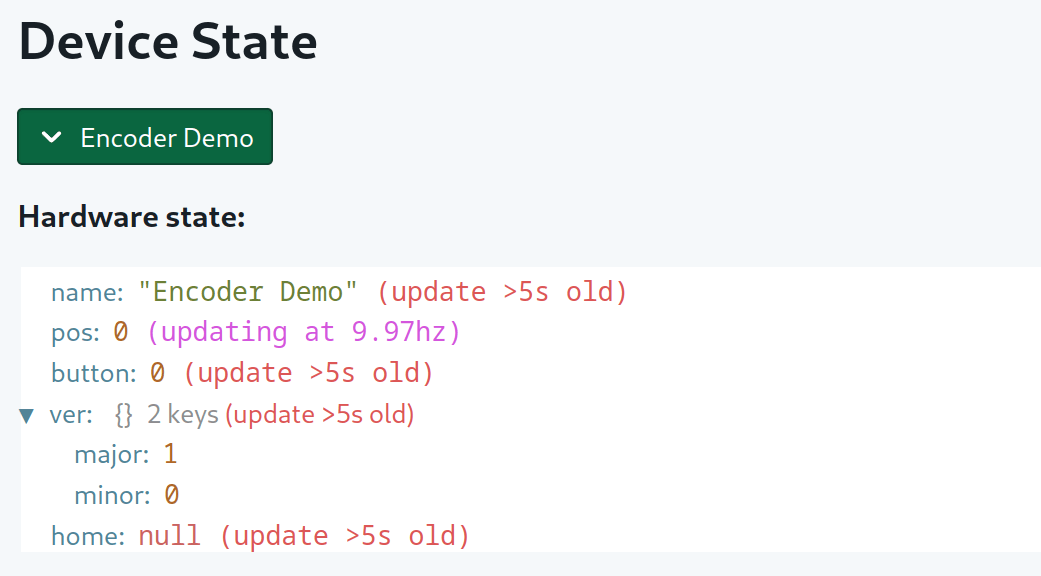
Launch the dev environment with arc start and without making any changes we can connect to the hardware and look for our tracked variables using the transport debugger tooling. If the window doesn't open by default, open it in the menubar "DevTools -> Show Transport Window".
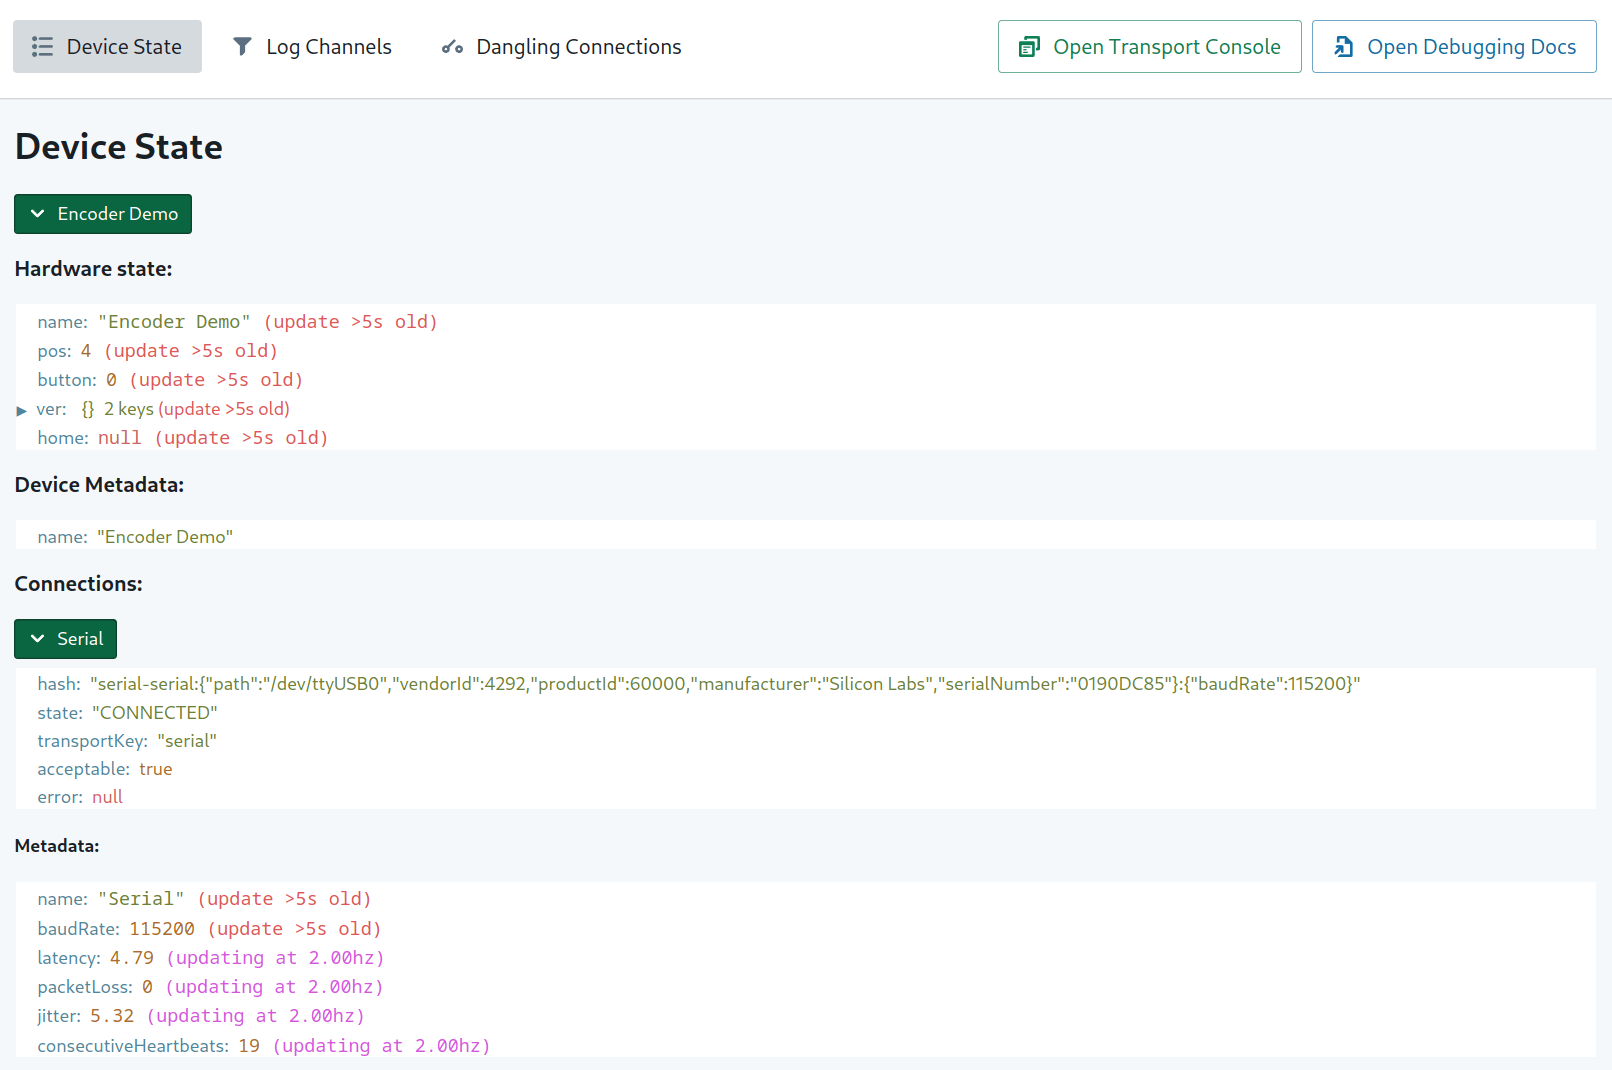
Rotating the encoder by hand and pushing the button should cause updates to the variables in the "Hardware state" section.
Plotting Position Info
Because the template was expecting led_blink tracked variables we don't see our data without some changes. Lets plot the encoder position and display the button press info as text.
In /src/application/pages/DevicePages/OverviewPage.tsx, rename and update the useMessageDataSource() hook to use the pos tracked variable.
export const OverviewPage = (props: RouteComponentProps) => { const encoderPosDS = useMessageDataSource('pos') // ...We'll use the Printer component to display the current encoder position as text.
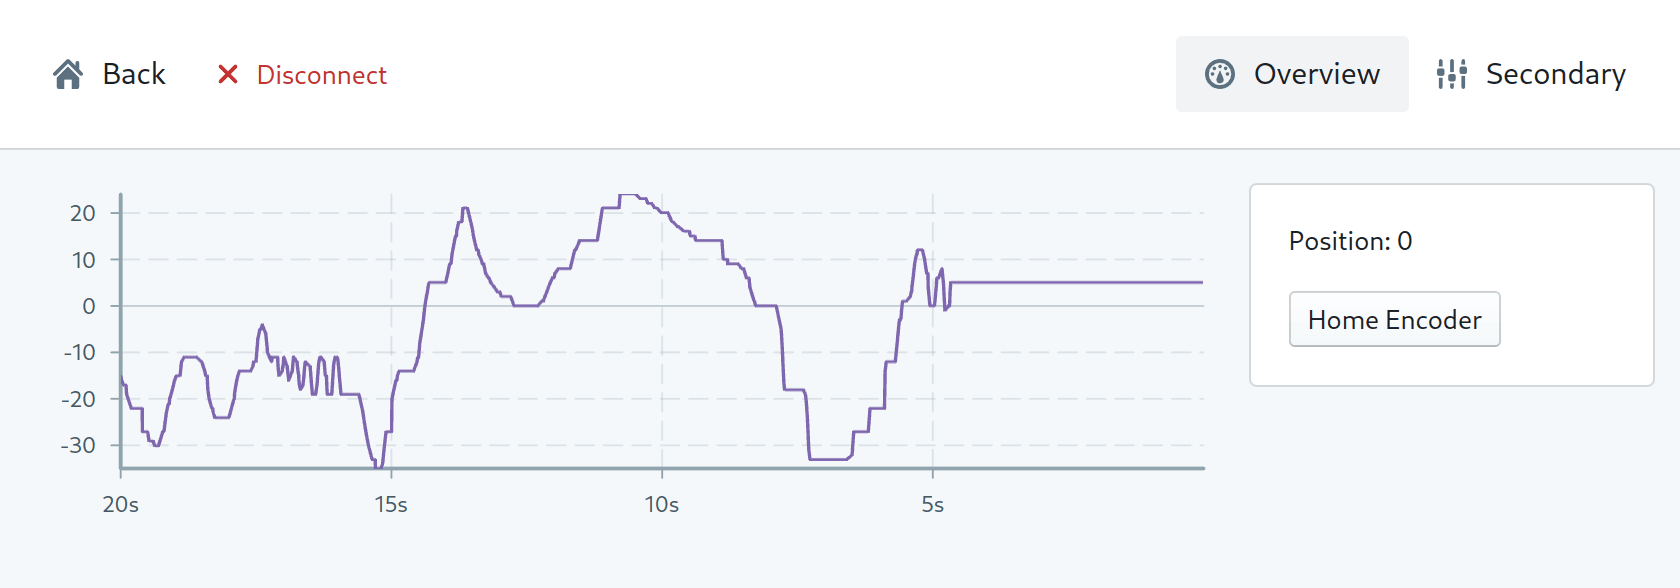
import { Printer } from '@electricui/components-desktop'Similar to the getting started guide, modify the template's named layout however you like, removing the Slider and Light areas. Here's an broad example which has Chart and Info sections
const layoutDescription = ` Chart Info`export const OverviewPage = (props: RouteComponentProps) => { const encoderPosDS = useMessageDataSource('pos') return ( <React.Fragment> <Composition areas={layoutDescription} gap={10} autoCols="3fr 1fr"> {Areas => ( <React.Fragment> <Areas.Chart> <ChartContainer> <LineChart dataSource={encoderPosDS} /> <RealTimeDomain window={20000} yMaxSoft={24} yMinSoft={-24}/> <TimeAxis /> <VerticalAxis /> </ChartContainer> </Areas.Chart> <Areas.Info> <Card> Position: <Printer accessor="pos"/> </Card> </Areas.Info> </React.Fragment> )} </Composition> </React.Fragment> )}Callback function with a button
Import the Button component and add it under the position text inside the Info card.
Instead of using a writer prop to change data, we only need to provide the message ID to the callback prop. This will trigger the callback function on the microcontroller when the button is pressed.
import { Button } from '@electricui/components-desktop-blueprint'<Card> Position: <Printer accessor="pos"/> <br/> <Button callback='home'> Zero Encoder </Button></Card>When we click the button on the UI, we can see the value reset!
Making booleans human readable
The push-button information is sent as a bool in the button message ID. This means printing it directly will display a 0 or 1 value instead of readable text.
By using the useHardwareState() hook, we're able to access hardware state information and manipulate it. This example uses a simple conditional to change the value, but any normal Typescript code can be used in this manner.
import { useHardwareState } from '@electricui/components-core'export const OverviewPage = (props: RouteComponentProps) => { const encoderPosDS = useMessageDataSource('pos') const buttonState = useHardwareState('button') let buttonString = "Unknown" if(buttonState) { buttonString = "Down" } else { buttonString = "Up" } return (We can then use our buttonString variable in the UI layout however we like...
Pushbutton: {buttonString}<br/>Position: <Printer accessor="pos"/><br/><Button callback='home'> Home Encoder</Button>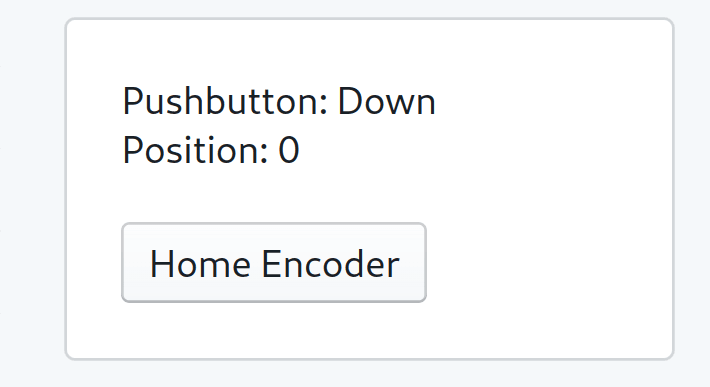
Decoding and Displaying Version Info
Remember the custom type we made for the version information? This requires a few changes which follow the same general process as any other UI side codec.
First, declare it in the /src/application/typedState.ts file
export type VersionInfo = { major: number minor: number}then write out the codec for the transport-manager to use in /src/transport-manager/config/codecs.tsx.
import { Codec, Message } from '@electricui/core'import { SmartBuffer } from 'smart-buffer'import { VersionInfo } from '../../application/typedState'export class VersionCodec extends Codec<VersionInfo> { filter(message: Message): boolean { return message.messageID === 'ver' } encode(payload: VersionInfo): never { throw new Error('The encoder version info is read only.') } decode(payload: Buffer) { const reader = SmartBuffer.fromBuffer(payload) const settings: VersionInfo = { major: reader.readUInt8(), minor: reader.readUInt8(), } return settings }}Currently, this custom codec needs to be provided to the serial transport handling code in src/transport-manager/config/serial.tsx. This is replacing the existing template LEDCodec import and usage.
import { VersionCodec } from './codecs' const customCodecs = [ new VersionCodec(), // Create each instance of the codecs ]We're aware this process is a bit tedious and a rework is coming with the Device Templates update.
We can now see the structured elements in the Transport Debugger view underneath the ver message ID drop-down,
Back in the OverviewPage.tsx file, we can display these on the UI if needed. This could be done with a pair of Printer components using accessor syntax or more useHardwareState() hook usage.
<Printer accessor={state => state.ver.major}/>const vMajor = useHardwareState(state => state.ver.major)What's Next
This guide should have described how to integrate some more interesting hardware.

If you haven't read them already, I strongly recommend reading these guides for understanding how to handle more complicated packet structures as your UI grows in complexity.
We're in the process of re-structuring our docs to ease the progression from quick-start into more advanced topics and would love feedback.